The specific references to Signal/OL LEDs, Trims, and Remote Levels are all specific to the L1™ Model I and Classic. The principles are applicable to the entire Bose® Personalized Amplification System™ family of products.
For Vocal Microphones try this short video tutorial.
Ken-at-Bose [1] talks about setting the gain for your microphone.
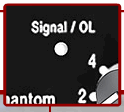
Please review the instructions for setting the trim level on Channel 1 and 2. Sing as loud as you're going to sing with your lips touching the windscreen and adjust the trim so that the LED just flickers RED. (You can do this with the channel and master volumes on the remote turned all the way down.
Remember that when you want to be your loudest vocally, you're lips should be touching the windscreen. You can always "work" the mic by backing away from it to lower volume but always remember that when you need to be loudest, you're kissing that windscreen.
This technique is true for ANY live amplification system, not just ours.
One difference in gain staging the T1 and the Classic is that the T1 has a three-stage trim LED. It lights up green when signal is present, yellow when you are getting pretty loud (8 to 10 dB of headroom left), and red when you dangerously close to or at full scale.
In a way, the yellow trim on the T1 is similar to how you treat the red on the Classic. Some yellow during peaks is good on the T1, just like some red on the Classic is good.
If the T1 trim is going red, you should back off, you are definitely nearing or in compression.
A really helpful feature on the T1 is to go to the Prefs/Output Level menu, and see where you are relative to maximum output.
The L1 Pro models share a common user interface and the L1 App. This page has links to resources for all three models and the Bose products that integrate with them.
These are questions that come from people who use Bose L1 Pro systems. The answers are from Bose, authoritative sources, best practices in the field and first-hand experiences.
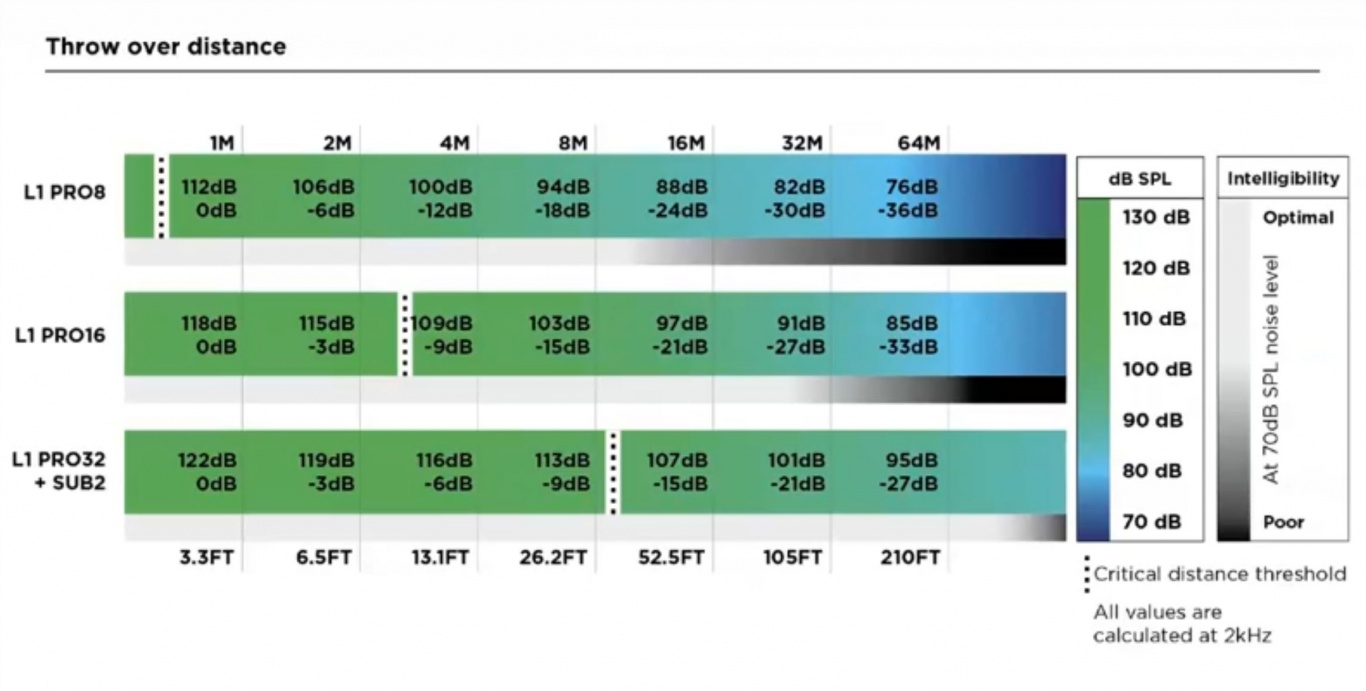
Several factors determine how large an area you can cover with your sound.
The distance to the listener farthest away
The noise level in the listening area
Walls and boundaries that affect reflections that support low frequencies
Use the chart below to see the performance over distance of the different models. This will help you to predict how well you can be heard at a distance.
This is the chart used to estimate critical distance and drop-off over distance.
There is a lot more information, including comparisons to legacy models, in this article Throw Over Distance
Pro16 "wobble" is an exaggerated myth. There are no line array systems with zero wobble, and the L1 Pro16 is within the range of legacy and competitor systems with regard to play in the array. The extension is a durable polypropylene plastic with a sufficient wall thickness, which has proven to have a high flexural strength and has passed all quality, reliability (thousands of mating cycles), and safety tests. Performance of the system is not affected, as the connections between the array, extender and bass module are very secure and would require a significant amount of force to damage. The L1 Pro16, all current L1 Pro systems, and legacy L1 products meet the same horizontal force stability requirements (or tip testing requirements). Lastly, the electrical connectors used in the L1 Pro16 are the same that have been used on legacy L1 products, which have 17+ years of field usage and satisfactory performance.
Source: Craig Small, Product Manager, Bose Professional on Facebook 2020-12-29
The L1 Pro system extensions are made of a very durable polypropylene with sufficient wall thickness, proven to have a high flexural strength and meets our rigorous quality, reliability, and safety testing requirements. Reliability testing includes mating and un-mating of the array, extension, and subwoofer components that simulates 10 years of product life, and revealed no degradation in fit or stability. Additionally, the L1 Pro16 meets the same horizontal force stability requirements, or tip testing requirements, that all our L1 legacy products, and current family of L1 Pro products meet. The margin in the extension, array, and subwoofer fit experienced by some users is common with portable line array designs, including our legacy L1 systems.
Source: Craig Small, Product Manager, Bose Professional on Facebook 2021-03-26
Use the Bose Updater to update compatible Bose products. This web-based updater is an easy way to keep your product up-to-date with the latest features and improvements.
Compatibility Information
To use the Bose updater, use a compatible computer operating system and web browser. While other operating systems and browsers might work, the updater is designed for those listed below.
Compatible operating systems
Windows 10 or later
macOS (the latest two versions)
Compatible web browsers
Chrome
Edge
Firefox
Safari
I just got my new Bose system. Do I NEED to update the firmware?
The System EQ feature on the L1 Pro systems applies an EQ preset to the master output. This is similar to a graphic equalizer on traditional analogue mixers, but it uses four presets instead for quick access:
Off - i.e. 'Flat', no EQ applied.
Live - best for live performances
Slight reduction in 100Hz, bump around 1KHz, slight reduction at 10KHz
Music - best for DJ sets.
Increase around 100Hz, increase around 10KHz
Speech - best for just dialogue, if using the system for public address.
Reduction between 100Hz and 500Hz, bump around 2KHz-3KHz, bump over 11KHz
The System EQ setting will not affect the system's XLR line output audio.
The L1 Pro32 can be used without the upper array. This configuration is useful when a venue ceiling cannot accommodate the height of the L1 Pro32 Source: Page 7 of the L1 Pro32 Owners Guide
For best results, ensure the array is at ear level for listeners
The L1 Pro32 automatically adjusts the level of the bass output to maintain the appropriate spectral balance.
It’s a valid use case to use only the bottom array section. In fact, the EQ automatically adjusts to compensate. Craig Small - Bose
Half Stack Not Recommended for Small Gigs
Running only the lower section of the Line Array is a workaround when there isn't enough ceiling clearance to use both sections. For small gigs, turn down the volume on the L1 Pro32, don't run without the top section of the array because
You'll need to elevate the system so the array is at ear level for the audience. Otherwise, the sound will be muffled
You will reduce your projection over distance. The sound will drop off more over distance.
You may need to turn up the volume louder than if you were using the full array. As a result, you increase the likelihood of feedback.
In addition to the three inputs on the L1 Pro systems, you can add a T4S. When you do,
The inputs and controls on the T4S operate independently from the inputs and controls on the L1 Pro
The three inputs on the L1 Pro operate independently of the T4S. The operation of the controls of the L1 Pro is the same whether or not a T4S is connected via the ToneMatch port.
You can connect from the T4S to one or two L1 Pro systems using the ToneMatch ports.
In addition to the three inputs on the L1 Pro systems, you can add a T8S. When you do,
The inputs and controls on the T8S operate independently from the inputs and controls on the L1 Pro
The three inputs on the L1 Pro operate independently of the T8S. The operation of the controls of the L1 Pro is the same whether or not a T8S is connected via the ToneMatch port.
You can connect from the T8S to one L1 Pro system using the ToneMatch port. There are also XLR and ¼″ (6.3 mm) Tip‑Ring‑Sleeve outputs.
An analog cable from the T1 ToneMatch Audio Engine Master Output to one of the L1 Pro channels (preferably channel 3)
Required
ToneMatch cable (these were included with the T1 ToneMatch Audio Engine), or network cable (CAT5/6/7) up to 50 feet OR you can use a ToneMatch Power Supply instead of connecting to the L1 Pro System[3] for power.
¼″ (6.3 mm) Tip‑Ring‑Sleeve cable. This is the preferred cable for best results, but you can use a ¼″ (6.3 mm) Tip‑Sleeve cable. You'll be more vulnerable to line noise but if your cable length is less than 20-25 feet, this can work.
Connections and initial settings
On the L1 Pro, turn off the system and turn down the volume on all channels
Power: Connect the L1 Pro[3] ToneMatch port to the T1 ToneMatch Audio Engine ToneMatch port using the ToneMatch cable
Audio: Connect the T1 ToneMatch Audio Engine Master Output to the L1 Pro[3] channel 3 unless you are already using it for Bluetooth or another sound source. This leaves channels 1 and 2 open for other sound sources.
On channel 3, set Treble and Bass at 12:00 (flat)
If you connect to L1 Pro[3] channel 1 or channel 2
Regarding T1 compatibility with the L1 Pro systems: The architecture of the T1 ToneMatch differs from that of the T4S and T8S ToneMatch mixers and is not compatible with the L1 Pro’s S/PDIF audio architecture.
The T1 ToneMatch is based on S/PDIF, but with a proprietary connection for legacy L1 products which allows them to carry other data such as firmware updates. The T4S and T8S ToneMatch mixers use an updated version of ToneMatch protocol, which is compatible with legacy L1 products, but also fully compatible with S/PDIF. Since the L1 Pro architecture is designed to use standard S/PDIF protocol, the T1 ToneMatch cannot communicate the same way and is unable to send audio via the ToneMatch port.
Although the T1 ToneMatch is unable to send audio it can still receive power from an L1 Pro system via the ToneMatch port. In order for the L1 Pro system to receive audio, users of the T1 ToneMatch would need to connect the analog main out of the T1 to an available input on the L1 Pro system.
* Use the T1 ToneMatch Audio Engine to add three more XLR/Combo jack inputs and channel 4/5 dual input (combines stereo to mono). You give up the third input on the L1 Pro System[3] but get four inputs — a net gain of three inputs
The L1 Pro32 built-in mixer has ToneMatch Presets, Bass, Treble, and Reverb.
If you prefer to run your inputs to the S1 Pro+ and send the output to the L1 Pro, see S1 Pro+ To L1 Pro
If you have a mixer, you may prefer to send the monitor mix from the mixer to the monitors instead of the L1 Pro Line Out
The L1 Pro was designed to be placed behind the performers.
If you can do that, you may not need a monitor — you should be able to hear yourself clearly.
For more about that, see The L1® Approach and the History Of Amplification.
By design, the input sensitivity of the Channel 3 ¼″ (6.3 mm) Tip‑Ring‑Sleeve input is lower than the ¼″ (6.3 mm) Tip‑Ring‑Sleeve inputs on Channels 1 and 2.
This allows Channel 3 to handle line‑level sources with less risk of clipping.
You can achieve the same overall output level from Channel 3, but you may need to turn the Channel 3 volume control higher to do it.
This difference is most noticeable when connecting a third‑party mixer to the L1 Pro.
People tend to hear louder as better, so you may prefer to use Channels 1 and 2 instead of 3, but you can get the same result by turning up the volume on Channel 3, leaving the other channels available.
L1 Pro systems can receive Bluetooth audio from a Bluetooth source (for example, a phone, tablet, or computer).
They cannot send Bluetooth to another L1 Pro, and even if they could, the latency (delay) would make this unusable in a live sound setting.
You can send the output of one L1 Pro to another (Daisy Chain), but you can't send the output of the second one back to the first.
That is: You cannot take the three inputs on each L1 Pro and hear all six inputs through both units.
Each unit only plays the signals connected to its own inputs.
If you want both L1 Pros to play the same mono mix, use a mixer and send the same output to each unit:
From the mixer Mono Output → L1 Pro (Left) Channel 3 ¼″ (6.3 mm) Tip‑Ring‑Sleeve input
From the mixer Mono Output → L1 Pro (Right) Channel 3 ¼″ (6.3 mm) Tip‑Ring‑Sleeve input
This gives you two identical mono feeds, but the L1 Pros still operate as separate systems.
You cannot take the three inputs on each L1 Pro and hear all six inputs through both units.
While you can daisy chain the inputs of the first L1 Pro to a second L1 Pro, you cannot send the inputs of the second L1 Pro back to the first. Doing so will create a feedback loop.
Hiss with nothing connected to the L1 Pro inputs when I turn up the volume
Symptoms
Hiss with nothing connected, volume turned up
Possible Causes
with no input, turning up the volume amplifies noise
Solutions
turn down the volume or mute any unused channels
For more details see L1 Pro Hiss
Hiss when connecting the LINE OUT from an L1 Pro to a second L1 Pro with an XLR cable
Symptoms
Hiss, noise, clipping
Possible Causes
LINE OUT from the first L1 Pro is line-level. XLR input on the second L1 Pro is microphone-level
Solutions
Connect the first L1 Pro LINE OUT to the second L1 Pro Channel 3 input
The cable: Female XLR to 1/4-inch (6.3mm) Tip-Ring-Sleeve cable
For more details see L1 Pro Daisy Chain
Hiss when connecting a mixer to the L1 Pro Channels 1 or 2 with an XLR cable
Symptoms
Hiss, noise, clipping
Possible Causes
No causes provided
Solutions
Connect the mixer mono output to the L1 Pro Channel 3 input
The cable: Female XLR to 1/4-inch (6.3mm) Tip-Ring-Sleeve cable
For more details see Mixer to L1 Pro
Feedback happens when the sound from the loudspeaker is louder at the microphone than the sound of the voice.
If the microphone “hears” more speaker than performer, the system will feed back.
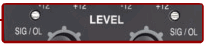
Set your source at its loudest performance level, then raise the Trim until you get solid green with occasional yellow (never red).
Once Trim is set, use channel volume for mixing — not Trim.
The first thing you do when connecting a sound source to your ToneMatch mixer is set the input trim. This is gain staging. Then you can set the ToneMatch Preset for your source. We'll do both in the short video below.
At the beginning of the video, I'm doing a factory reset so we don't bump into any old settings. You do not have to do a factory reset before you set the input trim on your ToneMatch mixer.
The trim controls across the top will be different
The trim controls across the top of your ToneMatch mixer will likely be different. This is because the output levels of your input sources will likely be different. This is normal.
Mixing - Use the volume controls not the trim controls
Once you have set the input trim, you should not have to change it until you change the input source (e.g. different microphone, singer, or instrument). Do not use the trim control to change the channel volume. Use the channel volume control.
Scenes
Saved Scenes do not capture the trim, channel volume, or Master Volume settings.
Set Up Your Source
Set your source at the maximum that it will be when performing.
Microphone
Sing directly into the microphone using close microphone technique (lips just brushing the windscreen). Sing as loudly as you will sing during your performance. You want to set the Trim to work at your maximum volume.
Instrument
Turn your input as high as it is likely to go during performance.
Trim Controls
The ToneMatch Mixer[4] trim controls for Channels 1-4 (1-8 for the T8S ToneMatch mixer) provide a significant gain increase when you reach the upper limit. This increase in gain is normal operation.
Most sources like typical microphones and piezo pickup systems can provide enough level without the need to add significant gain from the trim control. Certain sources like passive acoustic guitar pickups require additional gain and in these cases it can be necessary to set the trim level to the upper range of the control. When the trim control is set this high you may notice the gain change. This is normal operation. If you want to run the trim control at lower settings we recommend using a preamp or simple stomp box level booster.
The trim for Aux input channels 5/6 (9/10 for the T8S ToneMatch mixer) do not exhibit the same behavior as the trim controls for Channels 1-4 (1-8 for the T8S ToneMatch mixer). The Aux inputs are designed for line level sources and do not have the same gain staging as channels 5/6 (9/10 for the T8S ToneMatch mixer).
Here's a quick video to help you set the input trim for a microphone on the T1 ToneMatch Audio Engine. This is called Gain Staging.
The trim controls across the top will be different
The trim controls across the top of your T1 ToneMatch Audio Engine will likely be different. This is because the output levels of your input sources will likely be different. This is normal.
Mixing - Use the volume controls not the trim controls
Once you have set the input trim, you should not have to change it until you change the input source (e.g. different microphone, singer, or instrument). Do not use the trim control to change the channel volume. Use the channel volume control.
Scenes
Saved Scenes do not capture the trim, channel volume, or Master Volume settings.
The same principles apply to an instrument or line-level input.
Set the source to the highest level you will need during the show
Set the input trim so that you get solid green, occasional yellow flickers, and never see red.
Get close to the microphone when you want to be loud. No other technique has a big an impact on feedback. Each halving of distance is approximately another 6 dB of gain before feedback. This relationship in physics is known as the Inverse Square Law. This means that the difference between working a microphone at 2 inches, and 1/4 inch is 18 dB, which is more than twice as loud. While good mic technique often involves "working" the microphone at different distances, singers must be mindful of the fact that small changes in distance from the mouth result in very dramatic changes in sound level.
In the feedback diagram at the top, getting close to the microphone means getting more sound from voice which translates to more gain without feedback.
Yes.
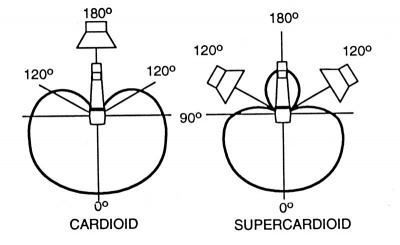
Supercardioid and hypercardioid microphones provide the best gain‑before‑feedback, followed by cardioid.
Omnidirectional microphones provide the least.
Use a directional microphone. Hypercardioid is better than cardioid, which is better than omnidirectional. All sound waves impinging on the microphone from a direction other than the intended signal is "noise" and will lower the threshold of feedback.
Directional microphones "collect" less sound from directions other than what they're supposed to amplify (the voice, or an instrument) and hence are less likely to feed back.
In addition, most directional microphones have a strong behavior called proximity effect. This is the strong buildup of bass and low-mid response as the source (say the voice) to microphone distance decreases. For microphones intended to sound natural when the voice is very close -- say one of a number of popular stage vocal microphones -- what this means is that low-to-middle frequencies from sources at a distance, including loudspeakers being used to amplify the voice, are largely rejected by the microphone. This is a real plus in terms of avoiding microphone feedback.
Conversely, an omnidirectional microphone (equal sensitivity to sound coming from any direction) has no proximity effect. This is an advantage, often in the studio where the engineer wants a consistent tone regardless of distance. But it's a disadvantage on stage in terms of feedback. An omnidirectional mic collects more sound that's not the target, and because it has no proximity effect, it is more susceptible to feedback at low-to-mid frequencies than a directional mic.
Omnidirectional and Unidirectional Microphones
Recommendation
Bose has always recommended using microphones with supercardioid or hypercardioid polar patterns for best gain-before-feedback with the Bose L1 systems.
For live sound applications with Bose systems, in preferred order, use:
Hypercardioid or Supercardioid
Audix OM 5, OM 3b, OM 6, OM 7, VX 5
EV N/D 767A
Neumann KMS 105
Sennheiser e 845, e 865, e 945, e 965, MD 441, MD 945,
Shure Beta 58A, Beta 87A
Cardioid
Sennheiser e 835, e 935, MD 935
Shure SM 58, SM 57, Beta 87C
Omnidirectional
Not recommended for live sound applications
Reference Reading
There are two basic types of microphone — omnidirectional and unidirectional[5]
.
Omnidirectional Microphone
Omnidirectional mic. It is sensitive to sounds from all directions.
It's unlikely you will use an omnidirectional microphone in a live performance setting. You will pick up too much ambient noise from the room, the audience, and the loudspeakers (leading to feedback).
Use omnidirectional microphones when the sound source could be anywhere around the microphone. This picks up a lot of room ambiance, which sometimes is the goal. Direct and ambient sound can be adjusted by moving the microphone closer to or further from the sound source.
Unidirectional Microphone
Unidirectional microphones are sensitive to sound coming from only one direction. Examples:
a vocalist singing directly on axis, directly into the microphone
a guitar amplifier with the microphone aimed directly at the speaker cone
All of the following types are unidirectional
Cardioid
The most common type of unidirectional microphone is called a “cardioid” because its pickup pattern is heart-shaped. It picks up most sound from the front of the microphone and some from the sides.
Although you will get better gain-before-feedback from a cardioid microphone than an omnidirectional microphone, you will get better gain-before-feedback from a supercardioid or hypercardioid microphone (see next section).
Examples of common cardioid microphones (good to great microphones, but not necessarily the best for gain-before-feedback with Bose L1 systems)
Sennheiser e 835, e 935, MD 935
Shure SM 58, SM 57, Beta 87C
Supercardioid / Hypercardioid
Supercardioid or hypercardioid microphones offer even greater sound isolation through narrower pickup patterns.
Examples of common supercardioid/hypercardioid microphones
Audix OM 5, OM 3b, OM 6, OM 7, VX 5
EV N/D 767A
Neumann KMS 105
Sennheiser e 845, e 865, e 945, e 965, MD 441, MD 945,
Other variants on the unidirectional polar pattern include supercardioid and hypercardioid options. Both patterns offer narrower front pickup angles than the cardioid – 115 degrees for the supercardioid and 105 degrees for the hypercardioid – alongside greater rejection of ambient sound. Additionally, while the cardioid is least sensitive at the rear (180 degrees off-axis), the supercardioid is least sensitive at 125 degrees and the hypercardioid at 110 degrees. When placed properly they can provide more 'focused' pickup than the cardioid pattern, but they also have less rejection at the rear. If you're using either of these polar patterns on stage with wedge monitors, it's important make sure you avoid placing the wedges directly behind the mic in this instance. Instead, place them either side at the mics least sensitive angle.
How many open microphones can I use before feedback becomes a problem?
Every time you double the number of open microphones, you lose about 3 dB of gain before feedback.
Use as few open mics as possible, and mute or gate unused ones.
Place your finger in the middle and then drag your finger up and down over the control (like a vertical slider). That works well and it is easy and intuitive.
Tap in the middle to toggle through Volume, Treble, Bass, Reverb - OR Tap on the words Volume, Treble, Bass, Reverb
Don't try to rotate or drag around the control.
Engineered with a powerful DSP engine and intuitive user control, the T4S/T8S ToneMatch mixers offer studio-quality EQ, dynamics and effects. Sound great with integrated BoseToneMatch processing and zEQ, especially when connected to a Bose L1 or F1 system for full end-to-end tonal control.
, L1 Model II, the L1 Compact, and the F1 Model 812 Flexible Array Loudspeaker, the Trim (Model II) and Volume (Compact/F1), these controls are actually trim controls. There is no master volume control later in the signal chain. The amps are running at full output. There is no need to "add a little extra" for headroom. If you do, you are unnecessarily amplifying noise (e.g. audible hiss/hum) during quiet moments and raising the likelihood of distortion when you get loud.
The L1 Pro models share a common user interface and the L1 App. This page has links to resources for all three models and the Bose products that integrate with them.
These are questions that come from people who use Bose L1 Pro systems. The answers are from Bose, authoritative sources, best practices in the field and first-hand experiences.
Several factors determine how large an area you can cover with your sound.
The distance to the listener farthest away
The noise level in the listening area
Walls and boundaries that affect reflections that support low frequencies
Use the chart below to see the performance over distance of the different models. This will help you to predict how well you can be heard at a distance.
This is the chart used to estimate critical distance and drop-off over distance.
There is a lot more information, including comparisons to legacy models, in this article Throw Over Distance
Pro16 "wobble" is an exaggerated myth. There are no line array systems with zero wobble, and the L1 Pro16 is within the range of legacy and competitor systems with regard to play in the array. The extension is a durable polypropylene plastic with a sufficient wall thickness, which has proven to have a high flexural strength and has passed all quality, reliability (thousands of mating cycles), and safety tests. Performance of the system is not affected, as the connections between the array, extender and bass module are very secure and would require a significant amount of force to damage. The L1 Pro16, all current L1 Pro systems, and legacy L1 products meet the same horizontal force stability requirements (or tip testing requirements). Lastly, the electrical connectors used in the L1 Pro16 are the same that have been used on legacy L1 products, which have 17+ years of field usage and satisfactory performance.
Source: Craig Small, Product Manager, Bose Professional on Facebook 2020-12-29
The L1 Pro system extensions are made of a very durable polypropylene with sufficient wall thickness, proven to have a high flexural strength and meets our rigorous quality, reliability, and safety testing requirements. Reliability testing includes mating and un-mating of the array, extension, and subwoofer components that simulates 10 years of product life, and revealed no degradation in fit or stability. Additionally, the L1 Pro16 meets the same horizontal force stability requirements, or tip testing requirements, that all our L1 legacy products, and current family of L1 Pro products meet. The margin in the extension, array, and subwoofer fit experienced by some users is common with portable line array designs, including our legacy L1 systems.
Source: Craig Small, Product Manager, Bose Professional on Facebook 2021-03-26
Use the Bose Updater to update compatible Bose products. This web-based updater is an easy way to keep your product up-to-date with the latest features and improvements.
Compatibility Information
To use the Bose updater, use a compatible computer operating system and web browser. While other operating systems and browsers might work, the updater is designed for those listed below.
Compatible operating systems
Windows 10 or later
macOS (the latest two versions)
Compatible web browsers
Chrome
Edge
Firefox
Safari
I just got my new Bose system. Do I NEED to update the firmware?
The System EQ feature on the L1 Pro systems applies an EQ preset to the master output. This is similar to a graphic equalizer on traditional analogue mixers, but it uses four presets instead for quick access:
Off - i.e. 'Flat', no EQ applied.
Live - best for live performances
Slight reduction in 100Hz, bump around 1KHz, slight reduction at 10KHz
Music - best for DJ sets.
Increase around 100Hz, increase around 10KHz
Speech - best for just dialogue, if using the system for public address.
Reduction between 100Hz and 500Hz, bump around 2KHz-3KHz, bump over 11KHz
The System EQ setting will not affect the system's XLR line output audio.
The L1 Pro32 can be used without the upper array. This configuration is useful when a venue ceiling cannot accommodate the height of the L1 Pro32 Source: Page 7 of the L1 Pro32 Owners Guide
For best results, ensure the array is at ear level for listeners
The L1 Pro32 automatically adjusts the level of the bass output to maintain the appropriate spectral balance.
It’s a valid use case to use only the bottom array section. In fact, the EQ automatically adjusts to compensate. Craig Small - Bose
Half Stack Not Recommended for Small Gigs
Running only the lower section of the Line Array is a workaround when there isn't enough ceiling clearance to use both sections. For small gigs, turn down the volume on the L1 Pro32, don't run without the top section of the array because
You'll need to elevate the system so the array is at ear level for the audience. Otherwise, the sound will be muffled
You will reduce your projection over distance. The sound will drop off more over distance.
You may need to turn up the volume louder than if you were using the full array. As a result, you increase the likelihood of feedback.
In addition to the three inputs on the L1 Pro systems, you can add a T4S. When you do,
The inputs and controls on the T4S operate independently from the inputs and controls on the L1 Pro
The three inputs on the L1 Pro operate independently of the T4S. The operation of the controls of the L1 Pro is the same whether or not a T4S is connected via the ToneMatch port.
You can connect from the T4S to one or two L1 Pro systems using the ToneMatch ports.
In addition to the three inputs on the L1 Pro systems, you can add a T8S. When you do,
The inputs and controls on the T8S operate independently from the inputs and controls on the L1 Pro
The three inputs on the L1 Pro operate independently of the T8S. The operation of the controls of the L1 Pro is the same whether or not a T8S is connected via the ToneMatch port.
You can connect from the T8S to one L1 Pro system using the ToneMatch port. There are also XLR and ¼″ (6.3 mm) Tip‑Ring‑Sleeve outputs.
An analog cable from the T1 ToneMatch Audio Engine Master Output to one of the L1 Pro channels (preferably channel 3)
Required
ToneMatch cable (these were included with the T1 ToneMatch Audio Engine), or network cable (CAT5/6/7) up to 50 feet OR you can use a ToneMatch Power Supply instead of connecting to the L1 Pro System[3] for power.
¼″ (6.3 mm) Tip‑Ring‑Sleeve cable. This is the preferred cable for best results, but you can use a ¼″ (6.3 mm) Tip‑Sleeve cable. You'll be more vulnerable to line noise but if your cable length is less than 20-25 feet, this can work.
Connections and initial settings
On the L1 Pro, turn off the system and turn down the volume on all channels
Power: Connect the L1 Pro[3] ToneMatch port to the T1 ToneMatch Audio Engine ToneMatch port using the ToneMatch cable
Audio: Connect the T1 ToneMatch Audio Engine Master Output to the L1 Pro[3] channel 3 unless you are already using it for Bluetooth or another sound source. This leaves channels 1 and 2 open for other sound sources.
On channel 3, set Treble and Bass at 12:00 (flat)
If you connect to L1 Pro[3] channel 1 or channel 2
Regarding T1 compatibility with the L1 Pro systems: The architecture of the T1 ToneMatch differs from that of the T4S and T8S ToneMatch mixers and is not compatible with the L1 Pro’s S/PDIF audio architecture.
The T1 ToneMatch is based on S/PDIF, but with a proprietary connection for legacy L1 products which allows them to carry other data such as firmware updates. The T4S and T8S ToneMatch mixers use an updated version of ToneMatch protocol, which is compatible with legacy L1 products, but also fully compatible with S/PDIF. Since the L1 Pro architecture is designed to use standard S/PDIF protocol, the T1 ToneMatch cannot communicate the same way and is unable to send audio via the ToneMatch port.
Although the T1 ToneMatch is unable to send audio it can still receive power from an L1 Pro system via the ToneMatch port. In order for the L1 Pro system to receive audio, users of the T1 ToneMatch would need to connect the analog main out of the T1 to an available input on the L1 Pro system.
* Use the T1 ToneMatch Audio Engine to add three more XLR/Combo jack inputs and channel 4/5 dual input (combines stereo to mono). You give up the third input on the L1 Pro System[3] but get four inputs — a net gain of three inputs
The L1 Pro32 built-in mixer has ToneMatch Presets, Bass, Treble, and Reverb.
If you prefer to run your inputs to the S1 Pro+ and send the output to the L1 Pro, see S1 Pro+ To L1 Pro
If you have a mixer, you may prefer to send the monitor mix from the mixer to the monitors instead of the L1 Pro Line Out
The L1 Pro was designed to be placed behind the performers.
If you can do that, you may not need a monitor — you should be able to hear yourself clearly.
For more about that, see The L1® Approach and the History Of Amplification.
By design, the input sensitivity of the Channel 3 ¼″ (6.3 mm) Tip‑Ring‑Sleeve input is lower than the ¼″ (6.3 mm) Tip‑Ring‑Sleeve inputs on Channels 1 and 2.
This allows Channel 3 to handle line‑level sources with less risk of clipping.
You can achieve the same overall output level from Channel 3, but you may need to turn the Channel 3 volume control higher to do it.
This difference is most noticeable when connecting a third‑party mixer to the L1 Pro.
People tend to hear louder as better, so you may prefer to use Channels 1 and 2 instead of 3, but you can get the same result by turning up the volume on Channel 3, leaving the other channels available.
L1 Pro systems can receive Bluetooth audio from a Bluetooth source (for example, a phone, tablet, or computer).
They cannot send Bluetooth to another L1 Pro, and even if they could, the latency (delay) would make this unusable in a live sound setting.
You can send the output of one L1 Pro to another (Daisy Chain), but you can't send the output of the second one back to the first.
That is: You cannot take the three inputs on each L1 Pro and hear all six inputs through both units.
Each unit only plays the signals connected to its own inputs.
If you want both L1 Pros to play the same mono mix, use a mixer and send the same output to each unit:
From the mixer Mono Output → L1 Pro (Left) Channel 3 ¼″ (6.3 mm) Tip‑Ring‑Sleeve input
From the mixer Mono Output → L1 Pro (Right) Channel 3 ¼″ (6.3 mm) Tip‑Ring‑Sleeve input
This gives you two identical mono feeds, but the L1 Pros still operate as separate systems.
You cannot take the three inputs on each L1 Pro and hear all six inputs through both units.
While you can daisy chain the inputs of the first L1 Pro to a second L1 Pro, you cannot send the inputs of the second L1 Pro back to the first. Doing so will create a feedback loop.
Hiss with nothing connected to the L1 Pro inputs when I turn up the volume
Symptoms
Hiss with nothing connected, volume turned up
Possible Causes
with no input, turning up the volume amplifies noise
Solutions
turn down the volume or mute any unused channels
For more details see L1 Pro Hiss
Hiss when connecting the LINE OUT from an L1 Pro to a second L1 Pro with an XLR cable
Symptoms
Hiss, noise, clipping
Possible Causes
LINE OUT from the first L1 Pro is line-level. XLR input on the second L1 Pro is microphone-level
Solutions
Connect the first L1 Pro LINE OUT to the second L1 Pro Channel 3 input
The cable: Female XLR to 1/4-inch (6.3mm) Tip-Ring-Sleeve cable
For more details see L1 Pro Daisy Chain
Hiss when connecting a mixer to the L1 Pro Channels 1 or 2 with an XLR cable
Symptoms
Hiss, noise, clipping
Possible Causes
No causes provided
Solutions
Connect the mixer mono output to the L1 Pro Channel 3 input
The cable: Female XLR to 1/4-inch (6.3mm) Tip-Ring-Sleeve cable
For more details see Mixer to L1 Pro
Feedback happens when the sound from the loudspeaker is louder at the microphone than the sound of the voice.
If the microphone “hears” more speaker than performer, the system will feed back.
Set your source at its loudest performance level, then raise the Trim until you get solid green with occasional yellow (never red).
Once Trim is set, use channel volume for mixing — not Trim.
The first thing you do when connecting a sound source to your ToneMatch mixer is set the input trim. This is gain staging. Then you can set the ToneMatch Preset for your source. We'll do both in the short video below.
At the beginning of the video, I'm doing a factory reset so we don't bump into any old settings. You do not have to do a factory reset before you set the input trim on your ToneMatch mixer.
The trim controls across the top will be different
The trim controls across the top of your ToneMatch mixer will likely be different. This is because the output levels of your input sources will likely be different. This is normal.
Mixing - Use the volume controls not the trim controls
Once you have set the input trim, you should not have to change it until you change the input source (e.g. different microphone, singer, or instrument). Do not use the trim control to change the channel volume. Use the channel volume control.
Scenes
Saved Scenes do not capture the trim, channel volume, or Master Volume settings.
Set Up Your Source
Set your source at the maximum that it will be when performing.
Microphone
Sing directly into the microphone using close microphone technique (lips just brushing the windscreen). Sing as loudly as you will sing during your performance. You want to set the Trim to work at your maximum volume.
Instrument
Turn your input as high as it is likely to go during performance.
Trim Controls
The ToneMatch Mixer[4] trim controls for Channels 1-4 (1-8 for the T8S ToneMatch mixer) provide a significant gain increase when you reach the upper limit. This increase in gain is normal operation.
Most sources like typical microphones and piezo pickup systems can provide enough level without the need to add significant gain from the trim control. Certain sources like passive acoustic guitar pickups require additional gain and in these cases it can be necessary to set the trim level to the upper range of the control. When the trim control is set this high you may notice the gain change. This is normal operation. If you want to run the trim control at lower settings we recommend using a preamp or simple stomp box level booster.
The trim for Aux input channels 5/6 (9/10 for the T8S ToneMatch mixer) do not exhibit the same behavior as the trim controls for Channels 1-4 (1-8 for the T8S ToneMatch mixer). The Aux inputs are designed for line level sources and do not have the same gain staging as channels 5/6 (9/10 for the T8S ToneMatch mixer).
Here's a quick video to help you set the input trim for a microphone on the T1 ToneMatch Audio Engine. This is called Gain Staging.
The trim controls across the top will be different
The trim controls across the top of your T1 ToneMatch Audio Engine will likely be different. This is because the output levels of your input sources will likely be different. This is normal.
Mixing - Use the volume controls not the trim controls
Once you have set the input trim, you should not have to change it until you change the input source (e.g. different microphone, singer, or instrument). Do not use the trim control to change the channel volume. Use the channel volume control.
Scenes
Saved Scenes do not capture the trim, channel volume, or Master Volume settings.
The same principles apply to an instrument or line-level input.
Set the source to the highest level you will need during the show
Set the input trim so that you get solid green, occasional yellow flickers, and never see red.
Get close to the microphone when you want to be loud. No other technique has a big an impact on feedback. Each halving of distance is approximately another 6 dB of gain before feedback. This relationship in physics is known as the Inverse Square Law. This means that the difference between working a microphone at 2 inches, and 1/4 inch is 18 dB, which is more than twice as loud. While good mic technique often involves "working" the microphone at different distances, singers must be mindful of the fact that small changes in distance from the mouth result in very dramatic changes in sound level.
In the feedback diagram at the top, getting close to the microphone means getting more sound from voice which translates to more gain without feedback.
Yes.
Supercardioid and hypercardioid microphones provide the best gain‑before‑feedback, followed by cardioid.
Omnidirectional microphones provide the least.
Use a directional microphone. Hypercardioid is better than cardioid, which is better than omnidirectional. All sound waves impinging on the microphone from a direction other than the intended signal is "noise" and will lower the threshold of feedback.
Directional microphones "collect" less sound from directions other than what they're supposed to amplify (the voice, or an instrument) and hence are less likely to feed back.
In addition, most directional microphones have a strong behavior called proximity effect. This is the strong buildup of bass and low-mid response as the source (say the voice) to microphone distance decreases. For microphones intended to sound natural when the voice is very close -- say one of a number of popular stage vocal microphones -- what this means is that low-to-middle frequencies from sources at a distance, including loudspeakers being used to amplify the voice, are largely rejected by the microphone. This is a real plus in terms of avoiding microphone feedback.
Conversely, an omnidirectional microphone (equal sensitivity to sound coming from any direction) has no proximity effect. This is an advantage, often in the studio where the engineer wants a consistent tone regardless of distance. But it's a disadvantage on stage in terms of feedback. An omnidirectional mic collects more sound that's not the target, and because it has no proximity effect, it is more susceptible to feedback at low-to-mid frequencies than a directional mic.
Omnidirectional and Unidirectional Microphones
Recommendation
Bose has always recommended using microphones with supercardioid or hypercardioid polar patterns for best gain-before-feedback with the Bose L1 systems.
For live sound applications with Bose systems, in preferred order, use:
Hypercardioid or Supercardioid
Audix OM 5, OM 3b, OM 6, OM 7, VX 5
EV N/D 767A
Neumann KMS 105
Sennheiser e 845, e 865, e 945, e 965, MD 441, MD 945,
Shure Beta 58A, Beta 87A
Cardioid
Sennheiser e 835, e 935, MD 935
Shure SM 58, SM 57, Beta 87C
Omnidirectional
Not recommended for live sound applications
Reference Reading
There are two basic types of microphone — omnidirectional and unidirectional[6]
.
Omnidirectional Microphone
Omnidirectional mic. It is sensitive to sounds from all directions.
It's unlikely you will use an omnidirectional microphone in a live performance setting. You will pick up too much ambient noise from the room, the audience, and the loudspeakers (leading to feedback).
Use omnidirectional microphones when the sound source could be anywhere around the microphone. This picks up a lot of room ambiance, which sometimes is the goal. Direct and ambient sound can be adjusted by moving the microphone closer to or further from the sound source.
Unidirectional Microphone
Unidirectional microphones are sensitive to sound coming from only one direction. Examples:
a vocalist singing directly on axis, directly into the microphone
a guitar amplifier with the microphone aimed directly at the speaker cone
All of the following types are unidirectional
Cardioid
The most common type of unidirectional microphone is called a “cardioid” because its pickup pattern is heart-shaped. It picks up most sound from the front of the microphone and some from the sides.
Although you will get better gain-before-feedback from a cardioid microphone than an omnidirectional microphone, you will get better gain-before-feedback from a supercardioid or hypercardioid microphone (see next section).
Examples of common cardioid microphones (good to great microphones, but not necessarily the best for gain-before-feedback with Bose L1 systems)
Sennheiser e 835, e 935, MD 935
Shure SM 58, SM 57, Beta 87C
Supercardioid / Hypercardioid
Supercardioid or hypercardioid microphones offer even greater sound isolation through narrower pickup patterns.
Examples of common supercardioid/hypercardioid microphones
Audix OM 5, OM 3b, OM 6, OM 7, VX 5
EV N/D 767A
Neumann KMS 105
Sennheiser e 845, e 865, e 945, e 965, MD 441, MD 945,
Other variants on the unidirectional polar pattern include supercardioid and hypercardioid options. Both patterns offer narrower front pickup angles than the cardioid – 115 degrees for the supercardioid and 105 degrees for the hypercardioid – alongside greater rejection of ambient sound. Additionally, while the cardioid is least sensitive at the rear (180 degrees off-axis), the supercardioid is least sensitive at 125 degrees and the hypercardioid at 110 degrees. When placed properly they can provide more 'focused' pickup than the cardioid pattern, but they also have less rejection at the rear. If you're using either of these polar patterns on stage with wedge monitors, it's important make sure you avoid placing the wedges directly behind the mic in this instance. Instead, place them either side at the mics least sensitive angle.
How many open microphones can I use before feedback becomes a problem?
Every time you double the number of open microphones, you lose about 3 dB of gain before feedback.
Use as few open mics as possible, and mute or gate unused ones.
Place your finger in the middle and then drag your finger up and down over the control (like a vertical slider). That works well and it is easy and intuitive.
Tap in the middle to toggle through Volume, Treble, Bass, Reverb - OR Tap on the words Volume, Treble, Bass, Reverb
Don't try to rotate or drag around the control.
Engineered with a powerful DSP engine and intuitive user control, the T4S/T8S ToneMatch mixers offer studio-quality EQ, dynamics and effects. Sound great with integrated BoseToneMatch processing and zEQ, especially when connected to a Bose L1 or F1 system for full end-to-end tonal control.
There are three gain settings for the primary channels (1 and 2) and two gain settings for the secondary channels (3 and 4).
Channels 1 or 2
To set the gain for the primary channels (1 or 2):
Adjust the input gain. Set the trim for the individual channel at the back panel of the PS1 Power Stand. Supply a maximum source signal and watch the LED, when you start to see it flash red, back off slowly on the trim potentiometer until it flashes green again.
Adjust the channel gain. The channel gain is controlled via the R1 Remote Control. With the master at zero, set the respective channel gain at 12 o'clock or 6 on the R1 Remote Control. At this point, the LED on the remote will be at the same intensity as the LED on the back panel of the PS1 Power Stand. This is considered optimum gain. The musician can then add a bit more from the R1 Remote Control if he/she requires.
Lastly, the R1 Remote Control MASTER knob is the last stage of gain. This knob gives you control over all 4 channels of the PS1 Power Stand.
Channels 3 or 4
To set the gain for the secondary channels (3 or 4):
Adjust the input gain of the individual channel. These channels do not have indicator LEDs but are optimized for 0dB line level signals, such as from an effects device, mixer or CD player.
As above, the R1 Remote Control MASTER knob is the last stage of gain. This knob gives you control over all 4 channels of the PS1 Power Stand.
Dialing in your sound IS a personal preference, but proper gain staging does have some technical right and wrongs.
The accepted rule is to set your gain as HIGH as possible, as EARLY in the signal chain as possible - and adjust each consecutive gain stage until you reach the last component. This will give you maximum headroom and the best signal-to-noise ratio. Every signal carries some noise with it, and if you set your gains too low at the front (preamp/mixer/processor), and then try to compensate for it at the end (L1 ), you will be magnifying the "noise" as well as the signal. The "cheaper" the equipment is that you're using in front, the more obvious this will be.
The easiest way to do this is to just VISUALIZE how your signal runs. Whatever your signal from the guitar or mic hits first - be it internal or external preamp, processor, mixer, whatever - maximize THAT trim control first. Having LED's to visually see the clipping makes this job much easier - just sing or play as loud as you plan to (turn the master down - you don't need to actually make noise to set your trims if you have LED's) and crank the trim/gain until it flashes red into clipping - then back it off a bit to give yourself some room. Then continue down the path of the signal chain - this includes any "inserts" into the chain - adjusting each component until you finally hit the L1™ , which is the end of your chain.
Every piece of equipment that I've used in my L1™ has benefited from this rule. I've had some pieces that had intolerable amounts of noise (the Digitech Vocal 300 comes to mind) when the gain at the Digitech was set low, and the L1 set high. When I reversed them back to the "rule" - set the Digitech gain as high as possible, and just adjust the trim at the L1™ only as needed, it became a usable piece of equipment.
OK – Gain, in the context of a highly transparent audio system. To some, the following will seem like long-winded nit picking. If you’re perfectly happy with the sound that you’re producing with your systems, no matter how you’re getting it, then by all means don’t fix what ain’t broken. To others, it may be perceived as overly simplified. Please know that I’m not trying to ‘dumb it down’. I offer this attempt at explaining how audio systems work, in the most non-technical language that I can muster, to anyone who wishes to learn how to coax the absolute best possible results from their audio system. Your critique, the measure of my success/failure, is welcome and appreciated…
The Source
Let’s begin at The Source.
Imagine a tiny wave riding down a wire at the speed of light. We know what caused the wave and that it was beautiful. We want to somehow use the tiny wave to move the air around us with sufficient energy and uniformity so that everyone in the space can hear that beautiful source clearly. When we hear the sound clearly, we may smile and leave it alone, or wince and choose to modify some of its traits, but ideally, any gizmos that we use along the way shouldn't impose unwanted changes...
Recorded sound > recorded sound player > wire > effects/mixer > wire >
The Gizmos
For the past several decades, we humans have strived to make our beautiful sources louder and clearer with the goesintas, comesoutas, amps and speakers of (cue announcer voice) THE SOUND SYSTEM. The mere mention of it strikes fear into the hearts of many, but it can really be quite friendly and effective if we understand how to make a few sensible adjustments to help it perform at its best. To those of us wanting only to produce and control what is heard by us and our audiences, these gizmos are nothing more or less than a series of controlled steps toward making our wave bigger. These steps are commonly referred to as gain stages by tech-head geeks like me. Let's look at the path that our tiny wave follows through an audio system:
Source – Our tiny wave. Its output connects to a gizmo with knobs and meters on it...
Trim – First stage of the gizmo. Makes the tiny wave bigger, just the right size for the gizmo to do its best work...
Level – Second stage of the gizmo. Brings the now bigger wave into balance with others that are sharing the gizmo and to where their mix creates a level that makes the next stage happy...
Master – Combines all of these bigger waves and sends them to the next stage at a level that makes it happy...
Power Amp – A last big boost, by far the biggest of all, so big that it can make a loudspeaker wiggle, a lot...
Loudspeaker – Makes air wiggle, a little or a lot...
Wiggling Air – Makes people wiggle. (Whole 'nother subject. Back to gain...)
Put it Together
For the simple sources above, we simply plug into an input channel of our favorite gizmo, hit it as hard as we're gonna and then adjust that channel's controls, step by step - first Trim, then Level - for the desired result, optimum performance. Repeat for each additional source. Then we bring up the Master volume control to the desired listening level. Now that we can hear the individual sources clearly, we can modify their tone with EQ, their mix (relative balance) with Level controls and the overall loudness of that mix with the Master, to suit our tastes and needs. Done.
The more complex sources above bring lots of their own gain stages to the party. Our ears hope that we've set them all correctly before we plug them into something that will let us hear them. Failure to optimize each and every one of them can and usually does result in unwanted changes to the source (e.g. hiss, insufficient level, distortion, feedback) which our L1s will very faithfully reproduce as wiggling air. For example, if we run the Master of an external sub mixer well below its output capacity, we're sending a mix that has higher hiss content than necessary to the next stage, the PS1 Input. We end up boosting that next stage to compensate, which boosts the signal, yes, but it also boosts the hiss by the same amount. Hiss is bad. It is unwanted noise. Some noise is inevitable in any gizmo, but since it is part of the sound to which we are critically listening, we want to minimize it wherever possible. We’re going for what tech-head geeks like me call ‘the highest possible signal-to-noise ratio'…
When wiggling air with our beloved half-cylinders, I propose that we'll always get the best possible sound quality when we set each and every stage of an external sub mixer, input through output, for optimum performance (as much signal as possible, but not too much) before connecting it to a PS1 input. Then we optimize the PS1 Input's trim control. Then level. Last of all, we adjust the overall system volume with the Master on the R1...
Notice that when we fire up a system without an R1 Remote connected, we hear noticeable hiss, even with nothing else connected to the system. This is because we’re running the system as if the Master was set to the 12:00 position, way higher than it needs to be for silence, or even for lower listening levels.
With no R1 Remote and sources connected and producing sound, we find the hiss to be noticeable only during silent passages and at lower listening levels. At louder listening levels, the signal has gone up while the hiss has stayed the same, so the hiss gets covered up, or masked by the louder signal.
The best and only way to minimize/eliminate the hiss during silence or lower listening levels is to optimize every stage before the R1 Remote Master and then use the R1 Remote Master to achieve the desired listening level. Using the system without the R1 Remote means that we’re stuck with any hiss that the system produces when that last stage stays set so high. It can also mean that we’re not allowing access to all of the available volume, since 12:00 is only half-way up the dial. If we’re always listening at a louder volume levels, never distracted by hiss and we don’t ever find ourselves wishing that we had a tad more volume, then we may certainly forgo the R1 Remote Remote…
Even without the R1 Remote control the system can get to full output if the input trims are carefully set.
If you do proper gain staging, the system will get to full output with all knobs at 12 o'clock.
Since proper gain staging is not trivial, we provide the extra gain to take up the slack if the input is not quite hot enough.[9]
you will probably raise the amount of noise in the signal path.
Set the Channel 2 input trim to 0
Set the Channel 3 input level to 0
Set the Channel 4 input level to 0
R1 Remote LED indicatorsAt this point the R1 Remote Channel LED should be doing the same thing as the PS1 Powerstand Signal O/L LED. Solid green, occasional red flickers.
On the R1 Remote
Bring up the Master Level to 12 o'clock (straight up)
If everything is working, you are probably hearing the System at very close to its volume limit.
Test: On the Mixer, set the master output all the way down:
If you are hearing a low frequency hum, check for a ground loops.
If you are hearing a buzz, check for sources of line noise.