(8 intermediate revisions by the same user not shown)
Line 1:
Line 1:
{{S1 Pro+ icon}}
{{DivToc
{{DivToc
|RightHead = Connect a Mixer to an S1 Pro+ Summary
|RightHead = Connect a Mixer to an S1 Pro+ Summary
|RightBody =
|RightBody =
=== The Simplest Thing That Could Possibly Work ===
=== The Simplest Thing That Could Possibly Work ===
There are many ways to connect a mixer to a Bose S1 Pro+, and just as many ways for things to go wrong. Different mixers, different cables, different output levels, different channel settings, and different ToneMatch presets create a huge number of permutations.
<details><summary>Keep it Simple</summary>
There are many ways to connect a mixer to a Bose S1 Pro+, and just as many ways for things to go wrong. Different mixers, different cables, different output levels, different channel settings, and different ToneMatch presets create a huge number of permutations.</details><br>
;Here is '''the simplest thing that could possibly work''':
;Here is '''the simplest thing that could possibly work''':
: Connect the mixer mono output to the S1 Pro+ Channel 3 input using the ¼″ (6.3 mm) Tip-Ring-Sleeve connection.
: Connect the mixer mono output to the S1 Pro+ Channel 3 input using the ¼″ (6.3 mm) Tip-Ring-Sleeve connection.
* Mixer with XLR Outputs
* Mixer with XLR Outputs
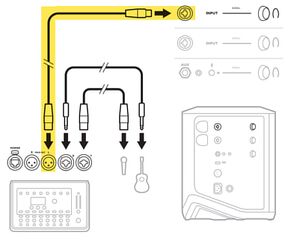
:[[File:Mixer to S1 Pro+ from OG1.jpg|thumb|Mixer to S1 Pro+ from Owners Guide]] Connect the mixer mono output to the S1 Pro+ Channel 1 or 2 XLR inputs. Use an XLR cable (e.g., typical microphone cable)
::Use an XLR‑to‑¼″ (6.3 mm) Tip-Ring-Sleeve cable from your mixer’s mono output into Channel 3 on the S1 Pro+.
::Use an XLR‑to‑¼″ (6.3 mm) Tip-Ring-Sleeve cable from your mixer’s mono output into Channel 3 on the S1 Pro+.
* Mixer with ¼″ (6.3 mm) Tip-Ring-Sleeve
* Mixer with ¼″ (6.3 mm) Tip-Ring-Sleeve outputs
::Use a ¼″ (6.3 mm) Tip-Ring-Sleeve‑to‑¼″ (6.3 mm) Tip-Ring-Sleeve cable from your mixer’s mono output into Channel 3 on the S1 Pro+.
::Use a ¼″ (6.3 mm) Tip-Ring-Sleeve‑to‑¼″ (6.3 mm) Tip-Ring-Sleeve cable from your mixer’s mono output into Channel 3 on the S1 Pro+.
These methods have the highest likelihood of success with the fewest variables and the least troubleshooting.
This method has the highest likelihood of success with the fewest variables and the least troubleshooting. It is the shortest, cleanest path to successfully connecting your mixer to your S1 Pro+.
This provides a robust, balanced, noise‑resistant connection and matches the L1 Pro’s line‑level input specifications.
This provides a robust, balanced, noise‑resistant connection and matches the S1 Pro+ line‑level input specifications.
{{ Callout
| type = warning
| title = No Y-Adapters
| text = For best results do '''NOT''' use any kind of Y-adapter to connect stereo outputs from a mixer to a mono input on an {{S1 Pro+}}. See [[Why_Not_Wye|Why Not Wye]] for details.'''
}}
=== 2. Connect to Channel 3 on the S1 Pro+ ===
=== 2. Connect to Channel 3 on the S1 Pro+ ===
Channel 3 is the most predictable and trouble‑free input for mixer use because:
Channel 3 is the most predictable and trouble‑free input for mixer use. <details><summary>Reasons</summary>
* No ToneMatch switch (not required with a mixer)
* No ToneMatch switch (not required with a mixer)
* No reverb
* No reverb
Line 39:
Line 46:
* Behaves consistently regardless of the source
* Behaves consistently regardless of the source
* Leaves Channels 1 & 2 free for microphones, instruments, or other sources
* Leaves Channels 1 & 2 free for microphones, instruments, or other sources
</details>
This simplicity is exactly why Channel 3 is recommended for external mixers.
=== 3. Set Initial Levels ===
=== 3. Set Initial Levels ===
Mixer main fader: 0 dB (unity)
Mixer main fader: 0 dB (unity)
Line 63:
Line 68:
Using Channel 3 for the mixer keeps Channels 1 and 2 available for performers and live inputs.
Using Channel 3 for the mixer keeps Channels 1 and 2 available for performers and live inputs.
Channels 1 and 2 are the full‑function inputs on the L1 Pro. They support:
Channels 1 and 2 are the full‑function inputs on the S1 Pro+. They support:
* Microphones (XLR)
* Microphones (XLR)
Line 79:
Line 84:
[[Category:Other]]
[[Category:Other]]
}}
}}
<details><summary>Full Detailed Version</summary>
<details><summary>Full Detailed Version</summary>
== Full Version ==
== Full Version ==
;For best results: Connect the output(s) of a mixer to the line-level inputs of the S1 Pro+. These are the 1/4-inch (6.3 mm) Tip-Ring-Sleeve jacks on channels 1, 2, 3.
;For best results: Connect the output(s) of a mixer to the line-level inputs of the S1 Pro+. These are the 1/4-inch (6.3 mm) Tip-Ring-Sleeve jacks on channels 1, 2, 3.
Line 139:
Line 146:
Connect the mixer Right Output to the other S1 Pro+ input 3 using the 1/4-inch (6.3 mm) Tip-Ring-Sleeve jack.
Connect the mixer Right Output to the other S1 Pro+ input 3 using the 1/4-inch (6.3 mm) Tip-Ring-Sleeve jack.
== Specifications for the Mixer Section ==
[[File:L1 Pro Mixer Section Specifications.jpg]]
Source: See [[{{PAGENAME}}#References|References section below]].
Source: See [[{{PAGENAME}}#References|References section below]].
There are many ways to connect a mixer to a Bose S1 Pro+, and just as many ways for things to go wrong. Different mixers, different cables, different output levels, different channel settings, and different ToneMatch presets create a huge number of permutations.
Here is the simplest thing that could possibly work
Connect the mixer mono output to the S1 Pro+ Channel 3 input using the ¼″ (6.3 mm) Tip-Ring-Sleeve connection.
Mixer with XLR Outputs
Mixer to S1 Pro+ from Owners Guide Connect the mixer mono output to the S1 Pro+ Channel 1 or 2 XLR inputs. Use an XLR cable (e.g., typical microphone cable)
Use an XLR‑to‑¼″ (6.3 mm) Tip-Ring-Sleeve cable from your mixer’s mono output into Channel 3 on the S1 Pro+.
Mixer with ¼″ (6.3 mm) Tip-Ring-Sleeve outputs
Use a ¼″ (6.3 mm) Tip-Ring-Sleeve‑to‑¼″ (6.3 mm) Tip-Ring-Sleeve cable from your mixer’s mono output into Channel 3 on the S1 Pro+.
These methods have the highest likelihood of success with the fewest variables and the least troubleshooting.
Recommended Connection Method
1. Use the Mixer’s Mono Output
If your mixer has a Left (Mono) output, use that.
If it does not, use the Left output and pan all mixer channels hard left so all signals feed that output.
Connect the output(s) of a mixer to the line-level inputs of the S1 Pro+. These are the 1/4-inch (6.3 mm) Tip-Ring-Sleeve jacks on channels 1, 2, 3.
Note
The XLR jacks on the S1 Pro+ are microphone-level signal sources, not line-level outputs found on most mixers. The S1 Pro+ line-level inputs are the 1/4-inch (6.3 mm) Tip-Ring-Sleeve jacks on channels 1, 2, 3.
Compatibility with Line-Level sources (e.g., many mixer outputs) to the XLR Inputs (Inputs 1 and 2) on the S1 Pro+.
Connecting a line-level source (such as mixer output) to a mic-level input can cause the sound to be loud and distorted because the line signal is much stronger than what the mic input will accept. Inputs and outputs on many mixers are switchable for either mic or line-level operation. If the mixer has the option to switch the output to mic-level, then you can use the XLR inputs on the S1 Pro+. Otherwise, you may have to turn down the output of the mixer or the input on the S1 Pro+ or use the 1/4 inch (6.3 mm) Tip-Ring-Sleeve inputs instead.
For best results, connect the output(s) of a mixer to the line-level inputs of the S1 Pro+.
Most mixers have line-level outputs. The S1 Pro+ line-level inputs are the 1/4-inch (6.3 mm) Tip-Ring-Sleeve jacks on channels 1, 2, 3.
The S1 Pro+ line-level inputs are the 1/4-inch (6.3 mm) Tip-Ring-Sleeve jacks on channels 1, 2, 3.
Don't connect Line-Level Inputs to the XLR Inputs (Inputs 1 and 2) on the S1 Pro+.
Connecting a line-level source (such as mixer output) to a mic-level input will cause the sound to be loud and distorted because the line signal is much stronger than what the mic input will accept. Inputs and outputs on many mixers are switchable for either mic or line level operation.
The nomenclature of "line" is from "telephone line." When the telephone network was being developed in the early 20th century, the nominal level of a telephone signal as it travelled along telephone cables was around 1 volt. So, 1 volt was a "line level" signal. [1]
Mixer Outputs
If the mixer has 1/4-inch (6.3 mm) Tip-Ring-Sleeve (balanced) outputs, use 1/4-inch (6.3 mm) Tip-Ring-Sleeve cables to connect to the S1 Pro+ line-level inputs.
If the mixer has 1/4-inch (6.3 mm) Tip-Sleeve (unbalanced) outputs (unbalanced), use 1/4-inch (6.3 mm) Tip-Sleeve cables to connect to the S1 Pro+ line-level inputs.
If the mixer has XLR outputs, use XLR Female to 1/4-inch (6.3 mm) Tip-Ring-Sleeve cables to connect to the S1 Pro+ line-level inputs.
Mixer to Single S1 Pro+
If you are connecting microphones or instruments to your S1 Pro+ and you want to add a mixer to your system, you will want to connect the mixer to S1 Pro+ input 3 using the 1/4-inch (6.3 mm) Tip-Ring-Sleeve jack.
You will want to get a mono output from the mixer to connect to the single input jack on input 3. For tips on how to do that, see: Stereo Mixer to Mono L1
Settings on the S1 Pro+
If you connect to channels 1 and 2
Set ToneMatch Switch to OFF
Set Bass and Treble Controls to 12:00 o'clock (this is flat)
Set Reverb fully counter-clockwise (this is off)
Set the Volume so you see solid green. If you see solid red, turn down the volume
If you connect to channel 3
Set the Volume so you see solid green. If you see red, turn down the volume
Important - MUTE any channels you are not using.
Mixer to Two S1 Pro+
Connect the mixer Left Output to one S1 Pro+ input 3 using the 1/4-inch (6.3 mm) Tip-Ring-Sleeve jack.
Connect the mixer Right Output to the other S1 Pro+ input 3 using the 1/4-inch (6.3 mm) Tip-Ring-Sleeve jack.