Template:S1 Pro with Sub1 or Sub2: Difference between revisions

mNo edit summary
mNo edit summary
 
(15 intermediate revisions by the same user not shown)
Line 1: Line 1:
{{T4S icon}}{{T8S icon}}{{S1 Pro icon}}{{Sub icon}}
=== Preferred Method ===
Connections with Sub1 or Sub2 and the {{S1 Pro}}


For best results, the signal flow should go from   
# [[File:Sub1 Sub2 io panel to S1 Pro.jpg|thumb|Sub io panel]]The signal source (e.g., {{ToneMatch Mixer}}, mixer, DJ console) output to  
# The Sub1 or Sub2 subwoofer LINE IN 1
# The Sub1 or Sub2 subwoofer LINE IN 1 ()
# The Sub1 or Sub2 subwoofer LINE OUT 1 to
# The {{S1 Pro}} with channel volume set to 10 o'clock.
;Note these settings on the Sub1 or Sub2
:👉 Set LINE IN EQ to '''L1'''
:👉 Set LINE OUT EQ to '''S1''' (Press and hold LINE OUT EQ button for 4 seconds)


Set up this way,  
Set up this way,  
Line 12: Line 19:
# The {{S1 Pro}} handles frequencies above 150 Hz


The picture shows a stereo setup, but illustrates the principles for mono.  The signal flow is from left to right.
;Mono - Example with a T4S as the audio source
* Start with the Volume on S1 Pro and Sub, as shown. Adjust as necessary from there.
 
[[File:T4S to Sub to S1 Pro.jpg|800px|T4S to Sub to S1 Pro]]
 
 
The picture shows a stereo setup.  The signal flow is from left to right.


[[File:S1 Pro with Sub.jpg|560px]]
[[File:S1 Pro with Sub.jpg|560px]]
Line 18: Line 31:
[[File:S1 Pro with Sub HPF.jpg|560px]]
[[File:S1 Pro with Sub HPF.jpg|560px]]


<div class="tocdiv">
    <div>
;Recommended cable
;Recommended cable
Use a {{1/4 TRS}} cable for best results.
Use an XLR to {{1/4 TRS}} cable for best results.  
 
[[File:14trstotrs.jpg|300px]]
 
</div>
<div>
You can use and {{1/4 TRS}} to XLR cable, but you will have to turn down the volume on the {{S1}} to avoid clipping the input.


[[File:14TRStoXLRMale.jpg|300px]]
[[File:XLRFemale to 14trs.jpg|300px]]
           
    </div>
</div>


If you use an XLR to XLR cable, the signal may be too hot for the {{S1 Pro}}.


<HTML><iframe width="560" height="315" src="https://www.youtube.com/embed/GZGRwhRXRNc?start=2659" title="YouTube video player" frameborder="0" allow="accelerometer; autoplay; clipboard-write; encrypted-media; gyroscope; picture-in-picture" allowfullscreen></iframe></html>


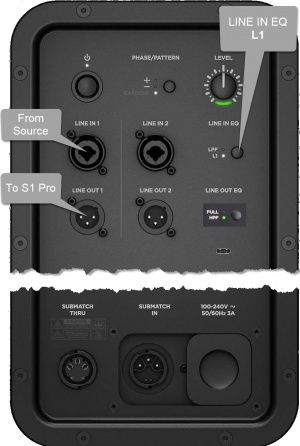
If you use the {{S1 Pro}} as the sound source (e.g., microphone and guitar and backing tracks via Bluetooth)  
=== Alternative Connection ===
; Can I connect the S1 Pro Line Out to the Sub?
The method described above is preferred, but you can use the {{S1 Pro}} as the sound source (e.g., microphone and guitar and backing tracks via Bluetooth)  
Note the following:
# The {{S1 Pro}} will sound the same as without the subwoofer (62 Hz - 17 kHz)
# The Sub1 or Sub2 will cover from 40 Hz (Sub1) 37 Hz (Sub2) to 150 Hz
# You will be able to push {{S1 Pro}} harder (louder) if you route the signal as described at the top of this article


----
----