T1 to T8S to Two L1 Model II: Difference between revisions
mNo edit summary |
|||
| (4 intermediate revisions by the same user not shown) | |||
| Line 1: | Line 1: | ||
<html><style> | |||
img { | |||
max-width: 100%; | |||
height: auto; | |||
} | |||
</style> | |||
</html> | |||
{{Model II icon}}{{T8S icon}}{{T1 icon}} | {{Model II icon}}{{T8S icon}}{{T1 icon}} | ||
This is an example of how you can connect a {{T1}} to a {{T8S}} to two {{Model II}} systems. | This is an example of how you can connect a {{T1}} to a {{T8S}} to two {{Model II}} systems. | ||
| Line 19: | Line 26: | ||
{{T4S/T8S Aux Inputs}} | {{T4S/T8S Aux Inputs}} | ||
On the {{T8S}} on the PAN/AUX setting for Aux Input (Channel 9) set the Pan to Left, Right, or Center as required. Center will send the {{T1}} output to both {{Model II}} systems. | On the {{T8S}} on the PAN/AUX setting for Aux Input (Channel 9) set the Pan to Left, Right, or Center as required. Center will send the {{T1}} output to both {{Model II}} systems. | ||
{{:T8S to L1 Model II}} | == Connect the {{T1}} Master Output to {{T8S}} Channel 8== | ||
Connecting to Channel 8 (or 1, 2, 3, 4, 5, 6, or 7) allows you to route the signal from the {{T1}} to the [[T8S Aux Outputs]]. This is appropriate if you need to hear the output of the {{T1}} through monitors connected to the {{T8S}} Aux outputs. | |||
[[File:T1 to T8S to L1 Model II x 2 Channel 8.png]] | |||
{{Balanced TRS from T1 to T8S}} | |||
=== {{T8S}} Aux Output Settings === | |||
Please see: [[T8S Aux Outputs]] | |||
== L1 Model II Gain Staging == | |||
For each {{Model II}} | |||
{{L1 Model II Analog Input Gain Staging|Device={{T8S}}}} | |||
---- | ---- | ||
[[Category:T1]] | [[Category:T1]] | ||
[[Category:T8S]] | [[Category:T8S]] | ||
[[Category:Model II]] | [[Category:Model II]] | ||
[[Category:Connections]] | |||
[[Category:Daisy Chain]] | |||
Latest revision as of 16:39, 10 October 2019
This is an example of how you can connect a T1 ToneMatch Audio Engine to a T8S ToneMatch mixer to two L1 Model II systems.
This assumes that you will run the T1 ToneMatch Audio Engine output as mono.
T1 Power
You won't be connecting the T1 to a power stand so you will need a T1 ToneMatch® Audio Engine power supply.
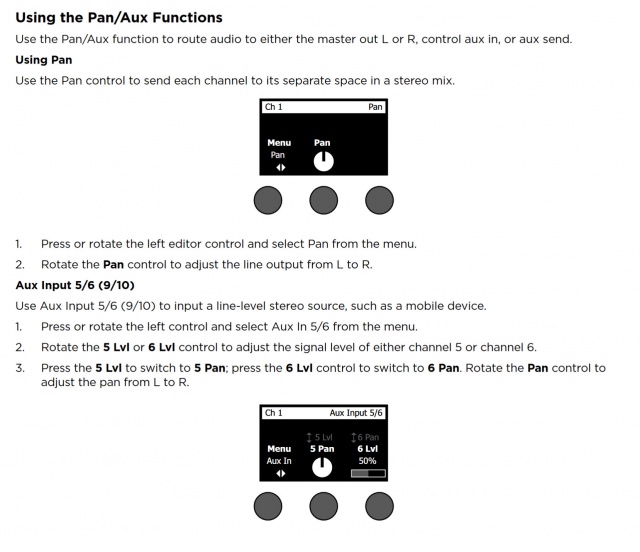
Connect the T1 ToneMatch Audio Engine Master Output to T8S ToneMatch mixer Aux Input Channel 9
Connecting to Aux Input Channel 9 leaves all eight full featured channels available for other inputs. You will need to control T1 Pan and Level using the T8S PAN/AUX settings.

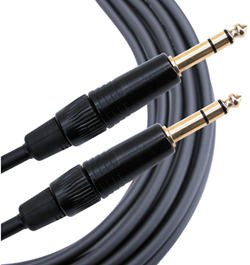
The output from the T1 ToneMatch Audio Engine is a balanced mono 1/4 inch (6.3 mm) Tip-Ring-Sleeve and the input on the T8S ToneMatch mixer is a balanced mono 1/4 inch (6.3 mm) Tip-Ring-Sleeve so use a cable like this.
 .
.
1/4" TRS Balanced Patch Cable (audiopile.net)
T8S ToneMatch mixer PAN/AUX Input Settings
Bose engineered the T4S/T8S ToneMatch mixers to have four (T4s) / eight (T8S) full-function channels and two Auxiliary inputs. The Aux inputs 5/6 (T4S) or 9/10 (T8S) are routed directly to the Main Output.
You can use the Pan and Level adjustments accessible through the PAN/AUX menu. There are no changes to routing, or signal processing available. Only T4S/T8S channels one through four (T4S) / channels one through eight (T8S) can be routed to the Aux Outputs.
The Aux inputs are useful for sources that have their own volume and signal processing (e.g. EQ or effects). They are similar to an effects return channel on other mixers. Use the Master Volume to raise and lower the volume of the Aux inputs in sync with the other channels. To change the volume of the Aux inputs relative to the other inputs you can use the AUX/PAN Level (soft menu), or on the source device.
Related discussions: n/a
On the T8S ToneMatch mixer on the PAN/AUX setting for Aux Input (Channel 9) set the Pan to Left, Right, or Center as required. Center will send the T1 ToneMatch Audio Engine output to both L1 Model II systems.
Connect the T1 ToneMatch Audio Engine Master Output to T8S ToneMatch mixer Channel 8
Connecting to Channel 8 (or 1, 2, 3, 4, 5, 6, or 7) allows you to route the signal from the T1 ToneMatch Audio Engine to the T8S Aux Outputs. This is appropriate if you need to hear the output of the T1 ToneMatch Audio Engine through monitors connected to the T8S ToneMatch mixer Aux outputs.

The output from the T1 ToneMatch Audio Engine is a balanced mono 1/4 inch (6.3 mm) Tip-Ring-Sleeve and the input on the T8S ToneMatch mixer is a balanced mono 1/4 inch (6.3 mm) Tip-Ring-Sleeve so use a cable like this.
.
1/4" TRS Balanced Patch Cable (audiopile.net)
T8S ToneMatch mixer Aux Output Settings
Please see: T8S Aux Outputs
L1 Model II Gain Staging
For each L1 Model II
L1 Model II Analog Input
The Analog input is a 1/4 inch (6.3 mm) Tip-Ring-Sleeve balanced input jack.

Analog input trim (volume, or gain) control
Setting the trim level on the Model II Power Stand is a one-time step. Once you have matched the output of the ToneMatch mixer to the input of the L1 you don't need to adjust it again.

T4S/T8S ToneMatch Mixers
- Connect the T8S ToneMatch mixer Main Output to the L1 Model II Analog Input
- Set the Analog Input trim to 9:00 o'clock. Control the volume with the Master Volume on the ToneMatch mixer.
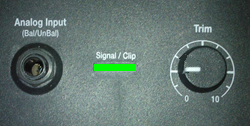
If you set the input trim higher, you will have excessive line noise. - If the Signal/Clip indicator glows red, decrease the Trim level so that it glows only green or yellow.

For third-party mixers
- Set the Trim control on the power stand to the 0 (zero) position.
- Connect the third-party mixer Main Output to the L1 Model II Analog Input
- Adjust the volume of the third-party Main Output to the reference or nominal output level.
- If the Signal/Clip indicator glows red, decrease the Trim level so that it glows only green or yellow.
