This article is a collection of snippets of information about the [http://kemperamps.com Kemper Profiling Amp].
<h2>Kemper Profiler</h2>
This article is a collection of snippets of information about the [http://kemperamps.com Kemper Profiler]. This page is an unofficial repository of useful things I've picked up along the way.
=== My Kemper Profilers ===
Sept 2025 [https://www.kemper-amps.com/products/profiler-player.html Kemper Profiler Player] with Level II and III Upgrades
Sept 2021 [https://www.kemper-amps.com/products/profiler/line-up Profiler PowerRack] with Kemper Kabinet
August 2020 [https://www.kemper-amps.com/stage Kemper Stage]
May 2016 [https://www.kemper-amps.com/remote Kemper Profiler Remote]
May 2014 [https://www.kemper-amps.com/profiler/overview Kemper Profiler] (unpowered, white). <br>This model was known as the Kemper Profiling Amp
My holy grail amp and the first amp I profiled: [[McIntyre BluesMaker II]]
* [https://www.kemper-amps.com/rig/exchange Rig Exchange], search for '''McIntyre'''
Gig Rig: [[L1 Pro|L1 Pro32 with Sub1]]. Depending on the size of the gig I may use a one or two L1 Pro32 or L1 Pro16 or L1 Pro8 with a [[T4S/T8S_ToneMatch®_Mixer]]
Fun Rig: Stereo — Two [[Media:EV M-12G EDS.pdf|EV M-12G]] (EVM-12L in floor-wedge cabinets) with two [[PackLite® power amplifier Model A1]] (250 Watts RMS, Class D amps)
Experimental: [https://en-us.sennheiser.com/double-wireless-in-ear-monitor-system-live-sound-ew-iem-g4-twin Sennheiser EW IEM G4-TWIN - Double Wireless In-Ear-Monitor-System]
The Profiler Head and Rack take about 1 minute and 15 seconds to boot. The Stage is a lot faster and takes about 15 seconds. The number of rigs in memory does only make a difference when the unit was powered off accidentally. If you use the power button or the chicken head to power the Profiler off the number of rigs does not make a difference in regards to the boot-up time.
See this separate page for the [[Kemper Profiler Player]]
== Profiles ==
== Profiles ==
Line 33:
Line 95:
== Quick Tips ==
== Quick Tips ==
=== Backup/Restore from Profiler Head to Stage ===
#Make sure both devices are running the same version of the operating system.
#On the Profiler Head/Powerhead/Rack/PowerRack backup to USB key
#On the Stage restore from backup using the USB key
The two machines should now be identical except for the following items, you will have to check.
#Global pedal assignments - the Stage has four PEDAL sockets, while the Head has two plus another four with Remote. These assignments don't automatically map to the Stage.
#Monitor Output Source - by default the Head MONITOR OUT is mono and optionally stereo, while the Stage offers a dedicated stereo MONITOR OUT. Therefore the output source of the MONITOR OUT might require your intervention.
Source: [https://www.kemper-amps.com/forum/index.php?thread/53554-switching-from-amp-head-to-a-used-stage-backup-and-profiles-questions/ Kemper Community - G-String]
You can automatically assign the Stomps and Effects to the Remote buttons I, II, III, IV. It will assign Stomps/Effects from left to right. For example, if you have only three stomps, and two effects, auto assign will assign the three stomps and the first effect.
This only works if none of the buttons have been assigned.
On the Profiler
* Press the Rig Button
* Use the Page buttons to navigate to page [6/6]
* On the display you will see "Press STORE to autoassign" <br>If you don't see the message, one or more of the buttons has already been assigned. Note, you can clear the assignments with the Soft buttons above the display.
* Press the STORE Button
=== Wet / Dry / Wet ===
[[File:Kemper Wet Dry Wet.jpg]]
== Rig Manager Tips ==
== Rig Manager Tips ==
=== Synchronize Two Instances of Rig Manager (Windows 10) ===
=== Synchronize Two Instances of Rig Manager (Windows 10) ===
There is no automated way to synchronize two instances of Rig Manager. You can manage manually this way.
{{Kemper Rig Manager Sync}}
== Performances ==
=== Naming in Performances ===
<blockquote>
Performance Name, Slot Name, Rig Name, Amp Name, Cabinet Name, other tags... are all different animals. People can use these for different purposes.
Performance Name could reflect the name of a song.
Slot Name could reflect a musical Scene e.g. "Solo".
Rig Name could reflect a combination of information like "Gilmourish SM57".
Amp Name could be "Hiwatt 100".
These are just examples.
Rig Name is normally a combination of pieces of information about provider of the Rig, amplifier, amp settings, microphone, instrument, purpose of the Rig.... It can be edited when you store a RIG (Store/Rename) or in the Rig Settings under Rig Tags (also Rig Tags in Rig Manager).
As long as Slot Name equals Rig Name, both change, if another Rig gets loaded into a Slot. Slot Name follows Rig Name. As soon as Slot Name and Rig Name deviate, the Slot Name sticks and doesn't follow, if you load another Rig. Slot Name can be changed in Edit/Slot Settings or Rig Manager.
Amplifier Name is one of a whole bunch of amplifier tags, which can be edited in the amplifier module under Amp Tags. The same applies to Cabinet Tags.
If you use the Page buttons on a Stage model or the Rig buttons on the Head or Rack to navigate between the slots while adjusting parameter values you only need to store the performance once.
While you navigate within a Performance using front panel controls or Rig Manager Editor, the edits of all five Slots are maintained. And if you store the Performance all five Slots are included in their current edited state.
# Designate one computer as the Source and the other, the Destination.
If you navigate within a Performance using foot buttons (Rig Buttons of Remote/Stage) or MIDI, the edits get withdrawn as soon as you load another Slot. If you store now, only the edits of the current Slot survive, the other four Slots 4 stay as these were stored before.
# On the Source, navigate to C:\Users\<username>\AppData\Local\Kemper Amps\RigManager
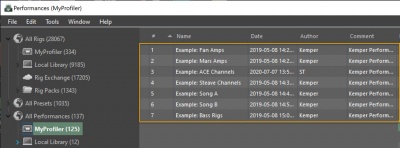
Here are the Kemper Performances that are factory installed with new Profilers (all models) as of this March 2021. I'm providing them here in case you need to re-install them.
# On a shared drive or USB key, create the same three folders (Local Library, Prf, Prst)
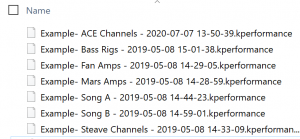
#[[File:Kemper Factory Performances 1.png|300px|right]]Extract the zip file into a folder. There are seven Performances. These are files with the extension .performance.<br>
# Copy the contents of the files you want to replicate into the respective folders on the shared drive or USB key
#Open Rig Manager
# On the Destination, navigate to C:\Users\<username>\AppData\Local\Kemper Amps\RigManager
#Arrange your desktop so you can see the contents of the folder and Rig Manager at the same time.
# Copy the contents of the shared drive or USB key to the respective folders on the destination
#<br>[[File:Kemper Factory Performances 2.jpg|400px|right]]Drag the Performance files (one at a time) to any New Performance<br>All Performances<br>- My Profiler<br>- - Any Performance called New Performance<br>Warning: If you drag a Performance on top of an existing Performance, the existing one will be overwritten.
#Put your Profiler into Performance Mode and enjoy.
The OS is not included in backups. Otherwise you could never use backups across software revisions. Just data and settings are included. Backups are always upward compatible. As written in the Main Manual you can share backups between Stage and other models and this worked since day one. You just need to be aware, that the hardware architecture differs in a few areas, which requires a few decisions:
*The Stage has no MIDI THRU.
*Its MONITOR OUT is stereo by design, while it is optionally stereo at other models.
*The Stage supports two effect loops.
*Its PEDAL sockets 1-4 don't match the PEDAL sockets of other models 1+2 plus Remote 3-6.
If you are using these features you might need to take a few decisions and adjust those settings, because these cannot be migrated automatically.
The configuration of sockets PEDAL 1 and 2 do actually map in both directions (classical PROFILER => Stage and vice verse)!
Configuration of PEDAL sockets 3-6 (Remote) are not mapped to the Stage. And configuration PEDAL 3 and 4 of the Stage are not mapped to the Remote. But all these are maintained and coexist in the backups.
So you could restore your Head's backup on the Stage.
Then on the Stage you need to configure its PEDAL 3 and 4 as needed.
If you then create a backup on the Stage and restore on the Head, both units hold the complete set of socket configurations.
Future backups can now be exchanged in both directions and the pedal configurations will stick.
Every Profiler and the Kemper Power Kabinet is perfectly matched in level.
In difference to an external power amp, it is impossible to hard-clip the power amp of the Kabinet.
'''For higher volumes, the analog volume control on the Kabinet should be set to maximum. <br>Then the volume is solely controlled by the Monitor Volume and the Power Amp Boost.'''
The Vintage Chorus type covers the sound character of all bucket brigade choruses since the CE-1. This is especially true when used before the amp.
When you use it after the amp to create a stereo sound, it will play two choruses at the same time, one on each side.
This is not exactly what the original bucked brigade choruses did. They played the direct signal on one stereo side, while playing the modulated effect signal on the other stereo side.
We do not support this mode, especially because bucked brigade choruses have a very limited frequency response on the effect signal of only 4 kHz.
We assume that you don't want to present your audience on the right PA side your guitar signal that only goes to 4 kHz.
This is why we created the Air Chorus, with both sides modulating, and no frequency response limit. A chorus with fairness, that couldn't be made in the 70's :)
You can try out: The Air Chorus sounds very similar to the Micro Pitch. But not equal due to the modulation.
How does the Air Chorus behave in mono? It depends, if you make a mono mix, or only tap one stereo side.
The former will create a chorus effect much stronger, the ladder will be about unnoticeable.
You can try easily at home at your monitor speakers without touching a cable:
Go to "Output Source" in the Output Menu and change "Main Output" from "Master Stereo" to "Master Mono" and "Master Left".
CK
Source: [https://www.kemper-amps.com/forum/index.php?thread/54428-question-about-air-chorus/&postID=595396#post595396 C Kemper]
== Multiple Profilers and Remotes on a Network ==
You can connect more than on Profiler and Remote on a Network.
[[File:Kemper 2 Profilers 2 Remotes.jpg|800px|Image adapted from the excerpt from the Kemper Main manual 8.5 page 300]]
You can assign a Remote to a specific Profiler by pressing 1 and TAP same time and select the desired Profiler from the list of Profilers listed on the display. Note that only Profilers in the network are listed.
You can also select the entry AUTOSELECT to revert to the default behavior (connect to any Profiler).
Source: [https://www.kemper-amps.com/forum/index.php?thread/55456-two-profilers-with-two-remotes-on-the-same-network-with-poe/&postID=604205#post604205 Timo - Kemper Support]
== Issues ==
=== Profiler Stage Loses Date/Time ===
:If the internal clock of your new PROFILER Stage always looses date and time when the unit is disconnected from the power network, it requires service. Sorry for the bad news and inconvenience, but this can't just be fixed by a software update nor by just exchanging the battery. Our service has a permanent fix. Please open a support ticket here and the situation will be dealt with professionally:
:https://www.kemper-amps.com/contact
:Just to let you know, the clock issues has not other functional implications. So, it's safe to use the unit for guitar playing.
=== Separate EQ or High/Low Cut for Monitor and Main Outputs ===
Here's a lively discussion including CKemper. It's in German, so this link runs it through a translator.
[https://www-kemper--amps-com.translate.goog/forum/index.php?thread/51484-low-cut-high-cut-im-output-menue/&pageNo=1&_x_tr_sl=auto&_x_tr_tl=en&_x_tr_hl=en-GB&_x_tr_pto=nui Low Cut/High Cut in Outputs for Monitor and Main]
== Liquid Profiling ==
=== Volume ===
The Liquid Profiling function does not change the behavior of the amp volume parameter. The difference between amp volume and rig volume is merely their position in the signal chain. While amp volume is located after the amp stack and before the effect section, allowing you to control the level before it hits the effects the rig volume is located at the very end of the signal chain and where it controls the overall volume of the rig including the effect section. In both cases, the only impact the volume has is in the perceived loudness of the rig. In no case does it change the actual sound of the rig. If you experience a change in sound it must be caused by the device that you use for monitoring the signal which might produce overtones because the volume of the signal arriving at the input of the monitoring device might clip the input section.
Set everything flat on the ToneMatch mixer and control the guitar sound on the Profiler. If necessary, use the [[zEQ]] or [[ParaEQ]] to solve acoustic issues at the venue. That is: Use the Profiler to create your guitar sound. If necessary, use the zEQ and ParaEQ on the ToneMatch to deal with the environment. That way, when you move to a different environment, you don't have to make changes to the Profiler.
==== Connections ====
Connect the Profiler Main Output to the ToneMatch mixer (since the ToneMatch mixer is the input to the FOH (Front of House)).
<section begin=MainOut />
* XLR connection. This is a balanced connection and it is preferable
* {{1/4 TS}} (Ordinary guitar cable). Avoid using this connection when you have cable runs in excess of 20 feet (six meters).<br>There is no advantage to using a {{1/4 TRS}} cable because the 1/4 inch (6.35 mm) Profiler outputs are unbalanced.
;Profiler Main Outputs:These are your main stereo outputs. Use these outputs to connect to a mixing desk in a recording studio, or to the front-of-house mixer in a live situation. These outputs deliver the entire Rig: amp, cabinet, and all effects. You have a choice of XLR (balanced) or quarter-inch TS-jacks (unbalanced). The XLR outputs are protected against 48V phantom power fed by a mixing desk. However, you should avoid feeding phantom power into the PROFILER if you want the best audio quality. Like all inputs and outputs, it offers a ground lift to prevent a loop hum.
Source: Kemper Main Manual
<section end=MainOut />
===== ToneMatch Mixer Aux Inputs =====
If you are short of channels you can use
1/4 (6.3 mm) Tip-Sleeve cable to the ToneMatch mixer Aux inputs.
* T1 input 4 and 5
* T4S inputs 5 and 6 (See: [[T4S Aux Inputs]])
* T8S inputs 9 and 10 (See: [[T8S Aux Inputs]])
==== Settings ====
In the Profile Output section, page 1, Set Main Output to Master Mono (or Master Stereo if you are running two L1 systems).
On the ToneMatch mixer, on the channel to which you have attached the Profiler
;ToneMatch Preset
:Category: Electric Guitars
:Preset: Flat E. Guitar ZEQ or General Processor [try both]
;ZEQ: Lo, Mid, Hi set to 0 (I use this for quick changes to compensate for room acoustics)
;ParaEQ: All bypassed
;Comp/Gate: Bypassed
;Mod: Bypassed
;Delay: Bypassed
;Reverb: Bypassed
=== No Mixer ===
If you are not using a mixer between the Profiler and the Bose system, this section is for you.
==== L1 Pro ====
{{L1 Pro icon}}
You can connect the Profile Main Output to the L1 Pro Input 3.
{{#lst:{{PAGENAME}}|MainOut}}
==== L1 Model 1S/L1 Model II ====
{{Model II icon}}{{Model 1S icon}}
Connect the Profiler Main Output to the Analog Input on the Power Stand.
Set the Analog Input Trim so you get a solid green light. If you see solid red, turn down the Trim
==== L1 Compact ====
{{Compact icon}}Connect the Profiler Main Output to Channel 2. Set the ToneMatch switch to Line Level (Down).
==== S1 Pro ====
{{S1 Pro icon}}Connect the Profiler Main Output to Channel 1 or 2.
{{#lst:{{PAGENAME}}|MainOut}}
Another option is to connect the Profiler headphone output to the S1 Pro Input 3 (the 1/8 inch (3mm) input). Input 3 is stereo.
This article is a collection of snippets of information about the Kemper Profiler. This page is an unofficial repository of useful things I've picked up along the way.
The Profiler Head and Rack take about 1 minute and 15 seconds to boot. The Stage is a lot faster and takes about 15 seconds. The number of rigs in memory does only make a difference when the unit was powered off accidentally. If you use the power button or the chicken head to power the Profiler off the number of rigs does not make a difference in regards to the boot-up time.
The Tonestack (EQ in the Stack) is different and softer. There is interaction between the controls, so there are no defined frequencies, that can be announced.
Let me say an important word, as assumptions like on this thread keeps me busy since quite a time. There were about four threads in the last too weeks where I had to disagree to assumptions made by measurements
Whenever you try to visualize a sonic behavior in means of scope, waveform display or frequency plot, to derive a deeper interpretation, you are very likely to fail.
What you see is rarely what you hear. Trust your ears instead!
It requires an immense knowledge to make qualified measurements and assumptions to derive better information by measurements and watching the results by your eyes, that you can simply hear with your ears.
In knowledge thereof, I rarely use scopes or analyzers for my development work, as I have failed to often by interpreting what I saw, even though I probably have the background knowledge needed.
Instead I use my ears every day.
This whole FRFR discussion is something, that I don't understand.
Linear speakers are never fully linear, that's true. But they try to.
Modern studio monitors are very linear. I had the chance to participate in a comparison test of different studio monitors.
The best of them sounded surprisingly equal, when different brands where compared.
However there is no absolute linearity, since the perceived frequency responce differs with the room we listen, and the angle to the speakers etc.
Is this a problem? Not at all.
We all grew up listening to speakers here, there and everywhere, and in the car e.g.
We listen to our favorite music by headphones, by kitchen radio, in our studio, by television. Some are better, some are worse.
In the same way we have listened to our guitar heros. The speakers that we utilized have an impact to their studio guitar sound, as well as to the rest of the music. Did we bother? Not really. If we didn't like a speaker, it was due to the general perception of the music, not explicitly the guitar sound.
Do you guys make your own music recordings with guitar embedded? You will run into the same situation as every other recording: It will be listened to by a variety of speakers.
Now to the pure guitar sound of the Profiler, which is a studio sound. Still not a different situation. The guitar sound is colored by the speakers in the exact same way a piece of music would be colored with that guitar embedded.
Would you ask for a complex EQ for correcting the frequency responce? Maybe yes. But the EQ should be set for the whole music, not just the guitar.
I am aware that many guitarists are not used to the studio sound of a guitar, even though they have listened to studio sounds all their live.
Users sometimes state profiles do not sound good through their speakers. Well, that's the sound of a guitar amp in a studio, heard through your speakers. Get used to it! it's reality.
Play along some music through the same speakers, and the sound will make sense.
Professional guitarists have got used to the studio sound of amps. They play in studios often, or by Inear monitors on stage. It is probably a similar situation like singers getting used to listen to their own recordings.
EQ presets for different FRFR simply do not make sense.
There is no pro guitarist or producer, that has ever asked us for a complex EQ or Highcut or Lowcut or correction curves for linear speakers. They know about the everpresent relativity of frequency responces, that is colouring music in whole as well as guitar sounds in detail.
If you cannot handle linear speakers for your guitar sound, then play the profiler through a guitar speaker.
But be aware that you have been listening to guitars by linear speakers for all your life, it's simply that the sound is odd to you when not embedded into music.
Make sure both devices are running the same version of the operating system.
On the Profiler Head/Powerhead/Rack/PowerRack backup to USB key
On the Stage restore from backup using the USB key
The two machines should now be identical except for the following items, you will have to check.
Global pedal assignments - the Stage has four PEDAL sockets, while the Head has two plus another four with Remote. These assignments don't automatically map to the Stage.
Monitor Output Source - by default the Head MONITOR OUT is mono and optionally stereo, while the Stage offers a dedicated stereo MONITOR OUT. Therefore the output source of the MONITOR OUT might require your intervention.
You can automatically assign the Stomps and Effects to the Remote buttons I, II, III, IV. It will assign Stomps/Effects from left to right. For example, if you have only three stomps, and two effects, auto assign will assign the three stomps and the first effect.
This only works if none of the buttons have been assigned.
On the Profiler
Press the Rig Button
Use the Page buttons to navigate to page [6/6]
On the display you will see "Press STORE to autoassign" If you don't see the message, one or more of the buttons has already been assigned. Note, you can clear the assignments with the Soft buttons above the display.
Press the STORE Button
Wet / Dry / Wet
Rig Manager Tips
Synchronize Two Instances of Rig Manager (Windows 10)
How do I transfer my Rig Manager settings from my desktop to my laptop (both running Rig Manager)?
You can use the Backup Rig Manager Content features on your desktop.
Transfer the backup file to your laptop,
Restore Rig Manager Backup on the laptop. You will find these functions in Tools.
How do I keep two computers running Rig Manager in sync?
There is no automated way to synchronize two instances of Rig Manager. You can do this manually in Windows. You may be able to do something similar on a Mac.
Designate one computer as the Source and the other, the Destination.
On the Source, navigate to C:\Users\<username>\AppData\Local\Kemper Amps\RigManager
Note: Folders for
Local Library (contains Rigs)
Prf (Contains Performances)
Prst (Contains Presets)
On a shared drive or USB key, create the same three folders (Local Library, Prf, Prst)
Local Library
Prf
Prst
Copy the contents of the files you want to replicate into the respective folders on the shared drive or USB key
On the Destination, navigate to C:\Users\<username>\AppData\Local\Kemper Amps\RigManager
Copy the contents of the shared drive or USB key to the respective folders on the destination
Performances
Naming in Performances
Performance Name, Slot Name, Rig Name, Amp Name, Cabinet Name, other tags... are all different animals. People can use these for different purposes.
Performance Name could reflect the name of a song.
Slot Name could reflect a musical Scene e.g. "Solo".
Rig Name could reflect a combination of information like "Gilmourish SM57".
Amp Name could be "Hiwatt 100".
These are just examples.
Rig Name is normally a combination of pieces of information about provider of the Rig, amplifier, amp settings, microphone, instrument, purpose of the Rig.... It can be edited when you store a RIG (Store/Rename) or in the Rig Settings under Rig Tags (also Rig Tags in Rig Manager).
As long as Slot Name equals Rig Name, both change, if another Rig gets loaded into a Slot. Slot Name follows Rig Name. As soon as Slot Name and Rig Name deviate, the Slot Name sticks and doesn't follow, if you load another Rig. Slot Name can be changed in Edit/Slot Settings or Rig Manager.
Amplifier Name is one of a whole bunch of amplifier tags, which can be edited in the amplifier module under Amp Tags. The same applies to Cabinet Tags.
If you use the Page buttons on a Stage model or the Rig buttons on the Head or Rack to navigate between the slots while adjusting parameter values you only need to store the performance once.
While you navigate within a Performance using front panel controls or Rig Manager Editor, the edits of all five Slots are maintained. And if you store the Performance all five Slots are included in their current edited state.
If you navigate within a Performance using foot buttons (Rig Buttons of Remote/Stage) or MIDI, the edits get withdrawn as soon as you load another Slot. If you store now, only the edits of the current Slot survive, the other four Slots 4 stay as these were stored before.
Here are the Kemper Performances that are factory installed with new Profilers (all models) as of this March 2021. I'm providing them here in case you need to re-install them.
Extract the zip file into a folder. There are seven Performances. These are files with the extension .performance.
Open Rig Manager
Arrange your desktop so you can see the contents of the folder and Rig Manager at the same time.
Drag the Performance files (one at a time) to any New Performance All Performances - My Profiler - - Any Performance called New Performance Warning: If you drag a Performance on top of an existing Performance, the existing one will be overwritten.
Put your Profiler into Performance Mode and enjoy.
The OS is not included in backups. Otherwise you could never use backups across software revisions. Just data and settings are included. Backups are always upward compatible. As written in the Main Manual you can share backups between Stage and other models and this worked since day one. You just need to be aware, that the hardware architecture differs in a few areas, which requires a few decisions:
The Stage has no MIDI THRU.
Its MONITOR OUT is stereo by design, while it is optionally stereo at other models.
The Stage supports two effect loops.
Its PEDAL sockets 1-4 don't match the PEDAL sockets of other models 1+2 plus Remote 3-6.
If you are using these features you might need to take a few decisions and adjust those settings, because these cannot be migrated automatically.
The configuration of sockets PEDAL 1 and 2 do actually map in both directions (classical PROFILER => Stage and vice verse)!
Configuration of PEDAL sockets 3-6 (Remote) are not mapped to the Stage. And configuration PEDAL 3 and 4 of the Stage are not mapped to the Remote. But all these are maintained and coexist in the backups.
So you could restore your Head's backup on the Stage.
Then on the Stage you need to configure its PEDAL 3 and 4 as needed.
If you then create a backup on the Stage and restore on the Head, both units hold the complete set of socket configurations.
Future backups can now be exchanged in both directions and the pedal configurations will stick.
A;
Every Profiler and the Kemper Power Kabinet is perfectly matched in level.
In difference to an external power amp, it is impossible to hard-clip the power amp of the Kabinet.
For higher volumes, the analog volume control on the Kabinet should be set to maximum. Then the volume is solely controlled by the Monitor Volume and the Power Amp Boost.
The Vintage Chorus type covers the sound character of all bucket brigade choruses since the CE-1. This is especially true when used before the amp.
When you use it after the amp to create a stereo sound, it will play two choruses at the same time, one on each side.
This is not exactly what the original bucked brigade choruses did. They played the direct signal on one stereo side, while playing the modulated effect signal on the other stereo side.
We do not support this mode, especially because bucked brigade choruses have a very limited frequency response on the effect signal of only 4 kHz.
We assume that you don't want to present your audience on the right PA side your guitar signal that only goes to 4 kHz.
This is why we created the Air Chorus, with both sides modulating, and no frequency response limit. A chorus with fairness, that couldn't be made in the 70's :)
You can try out: The Air Chorus sounds very similar to the Micro Pitch. But not equal due to the modulation.
How does the Air Chorus behave in mono? It depends, if you make a mono mix, or only tap one stereo side.
The former will create a chorus effect much stronger, the ladder will be about unnoticeable.
You can try easily at home at your monitor speakers without touching a cable:
Go to "Output Source" in the Output Menu and change "Main Output" from "Master Stereo" to "Master Mono" and "Master Left".
You can connect more than on Profiler and Remote on a Network.
You can assign a Remote to a specific Profiler by pressing 1 and TAP same time and select the desired Profiler from the list of Profilers listed on the display. Note that only Profilers in the network are listed.
You can also select the entry AUTOSELECT to revert to the default behavior (connect to any Profiler).
If the internal clock of your new PROFILER Stage always looses date and time when the unit is disconnected from the power network, it requires service. Sorry for the bad news and inconvenience, but this can't just be fixed by a software update nor by just exchanging the battery. Our service has a permanent fix. Please open a support ticket here and the situation will be dealt with professionally:
The Tonestack (EQ in the Stack) is different and softer. There is interaction between the controls, so there are no defined frequencies, that can be announced.
Let me say an important word, as assumptions like on this thread keeps me busy since quite a time. There were about four threads in the last too weeks where I had to disagree to assumptions made by measurements
Whenever you try to visualize a sonic behavior in means of scope, waveform display or frequency plot, to derive a deeper interpretation, you are very likely to fail.
What you see is rarely what you hear. Trust your ears instead!
It requires an immense knowledge to make qualified measurements and assumptions to derive better information by measurements and watching the results by your eyes, that you can simply hear with your ears.
In knowledge thereof, I rarely use scopes or analyzers for my development work, as I have failed to often by interpreting what I saw, even though I probably have the background knowledge needed.
Instead I use my ears every day.
This whole FRFR discussion is something, that I don't understand.
Linear speakers are never fully linear, that's true. But they try to.
Modern studio monitors are very linear. I had the chance to participate in a comparison test of different studio monitors.
The best of them sounded surprisingly equal, when different brands where compared.
However there is no absolute linearity, since the perceived frequency responce differs with the room we listen, and the angle to the speakers etc.
Is this a problem? Not at all.
We all grew up listening to speakers here, there and everywhere, and in the car e.g.
We listen to our favorite music by headphones, by kitchen radio, in our studio, by television. Some are better, some are worse.
In the same way we have listened to our guitar heros. The speakers that we utilized have an impact to their studio guitar sound, as well as to the rest of the music. Did we bother? Not really. If we didn't like a speaker, it was due to the general perception of the music, not explicitly the guitar sound.
Do you guys make your own music recordings with guitar embedded? You will run into the same situation as every other recording: It will be listened to by a variety of speakers.
Now to the pure guitar sound of the Profiler, which is a studio sound. Still not a different situation. The guitar sound is colored by the speakers in the exact same way a piece of music would be colored with that guitar embedded.
Would you ask for a complex EQ for correcting the frequency responce? Maybe yes. But the EQ should be set for the whole music, not just the guitar.
I am aware that many guitarists are not used to the studio sound of a guitar, even though they have listened to studio sounds all their live.
Users sometimes state profiles do not sound good through their speakers. Well, that's the sound of a guitar amp in a studio, heard through your speakers. Get used to it! it's reality.
Play along some music through the same speakers, and the sound will make sense.
Professional guitarists have got used to the studio sound of amps. They play in studios often, or by Inear monitors on stage. It is probably a similar situation like singers getting used to listen to their own recordings.
EQ presets for different FRFR simply do not make sense.
There is no pro guitarist or producer, that has ever asked us for a complex EQ or Highcut or Lowcut or correction curves for linear speakers. They know about the everpresent relativity of frequency responces, that is colouring music in whole as well as guitar sounds in detail.
If you cannot handle linear speakers for your guitar sound, then play the profiler through a guitar speaker.
But be aware that you have been listening to guitars by linear speakers for all your life, it's simply that the sound is odd to you when not embedded into music.
The Liquid Profiling function does not change the behavior of the amp volume parameter. The difference between amp volume and rig volume is merely their position in the signal chain. While amp volume is located after the amp stack and before the effect section, allowing you to control the level before it hits the effects the rig volume is located at the very end of the signal chain and where it controls the overall volume of the rig including the effect section. In both cases, the only impact the volume has is in the perceived loudness of the rig. In no case does it change the actual sound of the rig. If you experience a change in sound it must be caused by the device that you use for monitoring the signal which might produce overtones because the volume of the signal arriving at the input of the monitoring device might clip the input section.
1. First, consider creating a backup as this process will delete all user data and reset all global settings.
2. Upgrade to the current PROFILER operating system release software. If your Profiler is currently running a version older than 7.3.2 you need to update to that version first. You can find it here
3. Switch the PROFILER Head or Rack model off and press and hold soft button 1 (left above the display) while powering it on into tuner mode. If you are a STAGE user press the soft button 1 and the SYSTEM button and power the unit on.
4. Keep holding the soft button until "System Maintenance " appears on the display.
5. In maintenance mode press "Recovery", "Init&Factory Content", "Yes", "Ok".
6. Then press the Reboot soft button and reboot or simply restart the PROFILER with the chicken-head knob.
Set everything flat on the ToneMatch mixer and control the guitar sound on the Profiler. If necessary, use the zEQ or ParaEQ to solve acoustic issues at the venue. That is: Use the Profiler to create your guitar sound. If necessary, use the zEQ and ParaEQ on the ToneMatch to deal with the environment. That way, when you move to a different environment, you don't have to make changes to the Profiler.
Connections
Connect the Profiler Main Output to the ToneMatch mixer (since the ToneMatch mixer is the input to the FOH (Front of House)).
XLR connection. This is a balanced connection and it is preferable
1/4 inch (6.35 mm) Tip-Sleeve (Ordinary guitar cable). Avoid using this connection when you have cable runs in excess of 20 feet (six meters). There is no advantage to using a 1/4 inch (6.3 mm) Tip-Ring-Sleeve cable because the 1/4 inch (6.35 mm) Profiler outputs are unbalanced.
Profiler Main Outputs
These are your main stereo outputs. Use these outputs to connect to a mixing desk in a recording studio, or to the front-of-house mixer in a live situation. These outputs deliver the entire Rig: amp, cabinet, and all effects. You have a choice of XLR (balanced) or quarter-inch TS-jacks (unbalanced). The XLR outputs are protected against 48V phantom power fed by a mixing desk. However, you should avoid feeding phantom power into the PROFILER if you want the best audio quality. Like all inputs and outputs, it offers a ground lift to prevent a loop hum.
Source: Kemper Main Manual
ToneMatch Mixer Aux Inputs
If you are short of channels you can use
1/4 (6.3 mm) Tip-Sleeve cable to the ToneMatch mixer Aux inputs.
You can connect the Profile Main Output to the L1 Pro Input 3.
XLR connection. This is a balanced connection and it is preferable
1/4 inch (6.35 mm) Tip-Sleeve (Ordinary guitar cable). Avoid using this connection when you have cable runs in excess of 20 feet (six meters). There is no advantage to using a 1/4 inch (6.3 mm) Tip-Ring-Sleeve cable because the 1/4 inch (6.35 mm) Profiler outputs are unbalanced.
Profiler Main Outputs
These are your main stereo outputs. Use these outputs to connect to a mixing desk in a recording studio, or to the front-of-house mixer in a live situation. These outputs deliver the entire Rig: amp, cabinet, and all effects. You have a choice of XLR (balanced) or quarter-inch TS-jacks (unbalanced). The XLR outputs are protected against 48V phantom power fed by a mixing desk. However, you should avoid feeding phantom power into the PROFILER if you want the best audio quality. Like all inputs and outputs, it offers a ground lift to prevent a loop hum.
Connect the Profiler Main Output to the Analog Input on the Power Stand.
Set the Analog Input Trim so you get a solid green light. If you see solid red, turn down the Trim
Connect the Profiler Main Output to Channel 1 or 2.
XLR connection. This is a balanced connection and it is preferable
1/4 inch (6.35 mm) Tip-Sleeve (Ordinary guitar cable). Avoid using this connection when you have cable runs in excess of 20 feet (six meters). There is no advantage to using a 1/4 inch (6.3 mm) Tip-Ring-Sleeve cable because the 1/4 inch (6.35 mm) Profiler outputs are unbalanced.
Profiler Main Outputs
These are your main stereo outputs. Use these outputs to connect to a mixing desk in a recording studio, or to the front-of-house mixer in a live situation. These outputs deliver the entire Rig: amp, cabinet, and all effects. You have a choice of XLR (balanced) or quarter-inch TS-jacks (unbalanced). The XLR outputs are protected against 48V phantom power fed by a mixing desk. However, you should avoid feeding phantom power into the PROFILER if you want the best audio quality. Like all inputs and outputs, it offers a ground lift to prevent a loop hum.
Source: Kemper Main Manual
Another option is to connect the Profiler headphone output to the S1 Pro Input 3 (the 1/8 inch (3mm) input). Input 3 is stereo.