L1® Unofficial Performers' Guide: Difference between revisions
mNo edit summary |
m ST moved page L1® Unofficial Performers' Guide to L1® Unofficial Performers' Guide |
||
| (34 intermediate revisions by 3 users not shown) | |||
| Line 2: | Line 2: | ||
<big>'''The Unofficial Performers' Guide'''</big> | <big>'''The Unofficial Performers' Guide'''</big> | ||
for the | for the {{PAS}}. | ||
If you will be using the Bose System for the first, second, or third time and are looking for quick-hit things you need to know you are in the right place. This is for you in the role of performer who may or may not actually own an | If you will be using the Bose System for the first, second, or third time and are looking for quick-hit things you need to know you are in the right place. This is for you in the role of performer who may or may not actually own an L1® System. <!-- TODO Initially, I will write this with the solo or duo act in mind. There may be another version later for larger ensembles. --> | ||
If you just got your new System then you will want to check out the [[L1™ Unofficial Users' Guide]] which covers things that System owners like to know. | If you just got your new System then you will want to check out the [[L1™ Unofficial Users' Guide]] which covers things that System owners like to know. | ||
<table border="0"> | <table border="0" cellpadding="5"> | ||
<tr> | <tr> | ||
<td width="40%">__TOC__</td> | <td width="40%">__TOC__</td> | ||
<td> | <td valign="top"> | ||
<!-- not sure this belongs here or on a separate page, but I converted it to a template so we can present it in several places if we want --> | |||
{{ | [[Image:Bose-Mon8.jpg|Ashland MA Bose-East event photo by Drumr]] | ||
[[Image:Bose-Ashby34.jpg|Ashland MA Bose-East event photo by Drumr]] | |||
[[Image:Bose-Mon2.jpg|Ashland MA Bose-East event photo by Drumr]] | |||
<!-- | |||
not sure this belongs here or on a separate page, but I converted it to a template so we can present it in several places if we want | |||
{{L1® System Benefits}} | |||
--> | |||
<br /> | |||
[[L1® System Benefits]] | |||
{{AddThis}} | |||
</td> | |||
<td valign="top"> | |||
{{Search Box}} | |||
{{L1 Family Image}} | |||
</td> | </td> | ||
</tr> | </tr> | ||
</table> | </table> | ||
== Setting | |||
If you are stepping onto the stage and someone has made all the connections for you skip down to the section about Performing. | |||
== Setting Up == | |||
{{Model II icon}}{{Model I icon}}{{Classic icon}} | |||
If you are stepping onto the stage and someone has made all the connections for you skip down to the section about [[{{PAGENAME}}#Performing|Performing]]. | |||
=== Physical Assembly === | |||
{{Classic Model I Basic Setup}} | |||
=== Microphone Setup === | === Microphone Setup === | ||
{{Get Plugged In Microphone}} | {{Get Plugged In Microphone}} | ||
=== Multiple Performers Sharing One {{L1 no link}} System === | |||
{{Model II icon}}{{Model I icon}}{{Classic icon}} | |||
Electric guitarists used to play and sing through their amps, but this soon stopped when they started to concentrate on the tone of their guitars. Now, few musicians are willing to share their amps, based on the idea that any sound other than that of your instrument will somehow corrupt the tone. This is probably true for guitar amplifiers playing at heavy distortion levels (voice will be heavily modulated due to clipping). But it is not true of an {{L1 no link}} loudspeaker. | |||
Sharing should be restricted to musicians located near each other on stage, for example, two background singers standing shoulder to shoulder, or a horn line. | |||
Several instruments or instruments and voices can be amplified simultaneously with complete independence of tone and no corruption of any kind, other than having everything come from one source. Always try to take advantage of the ToneMatch® preset feature. | |||
{{Model I icon}}{{Classic icon}} | |||
For instance, if you are doing a “single” and have a drum machine and/or sequencer driving a bunch of MIDI modules, use channels 1 and 2 for personal-preference preset settings, like your vocal microphone and, say, an acoustic guitar with a pickup. Then use an external mixer, which you probably have if this example describes your musical work, and put it into channel 3 or 4. | |||
=== Connections General Examples === | === Connections General Examples === | ||
{{Model I icon}}{{Classic icon}} | |||
<!-- {{:PS1 Powerstand Connections}} too much detail --> | <!-- {{:PS1 Powerstand Connections}} too much detail --> | ||
| Line 33: | Line 75: | ||
==== Interactive Tour of the Inputs and Outputs ==== | ==== Interactive Tour of the Inputs and Outputs ==== | ||
{{PS1 Connections Interactive}} | {{PS1 Connections Interactive}} | ||
=== Connections for a Soloist === | === Connections for a Soloist === | ||
| Line 39: | Line 82: | ||
<br /> | <br /> | ||
</html> | </html> | ||
=== Soloist with Backing Tracks === | |||
{{:Vocalist with Backing Tracks L1}} | |||
=== Connections for a Duo === | === Connections for a Duo === | ||
| Line 52: | Line 98: | ||
</html> | </html> | ||
--> | --> | ||
=== Quick Hookup Guide === | |||
* [http://bose.infopop.cc/eve/forums/a/ga/ul/2501026994/hookupGuide_v081705.pdf Quick Hookup Guide] - Print this and keep it handy (especially for people unfamiliar with the system). This is a 6 page pdf document, that you can print and leave at any venue that provides an L1™ Classic or Model I for performers to use. It includes most of the information above. | |||
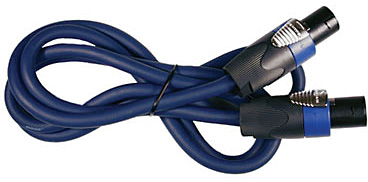
=== B1 Cables (blue) === | === B1 Cables (blue) === | ||
{{Model II icon}}{{Model I icon}}{{Classic icon}} | |||
* Make sure the Speakon cables (blue) are really connected. Insert and turn clockwise. There should be an audible click. You should have to slide the silver lock and twist counterclockwise to remove the cable. If you can remove it without a twist, it is not really connected. | * Make sure the Speakon cables (blue) are really connected. Insert and turn clockwise. There should be an audible click. You should have to slide the silver lock and twist counterclockwise to remove the cable. If you can remove it without a twist, it is not really connected. | ||
=== | |||
=== ToneMatch® Presets === | |||
{{Model II icon}}{{Model I icon}}{{Classic icon}} | |||
* Presets are used to get the best possible sound from your inputs. They are not meant to make something sound like something else (like Guitar processor or instrument patches). Note: The presets for vocal microphones are based on using ''close microphone'' techniques. | * Presets are used to get the best possible sound from your inputs. They are not meant to make something sound like something else (like Guitar processor or instrument patches). Note: The presets for vocal microphones are based on using ''close microphone'' techniques. | ||
| Line 66: | Line 118: | ||
== Performing == | == Performing == | ||
{{Model II icon}}{{Model I icon}}{{Classic icon}} | |||
=== Hearing yourself === | === Hearing yourself === | ||
This is a different approach to amplifying your sound. The sound of your voice and/or instrument will come from an {{L1 CR}} located 5-10 feet behind you. Unlike conventional approaches, you will not be behind the main speakers going to the room. | |||
How does it sound? - It may seem unusual for a few minutes because you are hearing yourself in much the same way the audience is hearing you. This is a big difference because you will be hearing yourself in the context of the room instead of out of context in the monitor. ... [[Hearing Yourself|full article]] | |||
How does it sound? - It may seem unusual for a few minutes because you are hearing yourself in much the same way the audience is hearing you. This is a big difference because you will be hearing yourself in the context of the room instead of out of context in the monitor. | |||
Hearing Yourself | |||
=== Mixing Yourself In Ensemble === | |||
Using a typical [[Triple Amplification System|triple amplification system]], a professional front-of-house mixer rides vocals, varies the level of horn sections and rides (and often misses) lead solos. They do this because they and not you can hear a mix over the mains “out front”. ... [[Mixing Yourself|full article]] | |||
=== Microphone Technique === | === Microphone Technique === | ||
| Line 87: | Line 136: | ||
=== Feedback === | === Feedback === | ||
Feedback occurs when sound coming from the Cylindrical Radiator® is reintroduced into the System and amplified again. You typically hear either a high pitched squeal or a low pitched howl. The first usually comes from a vocal microphone and the second is more likely from an acoustic instrument like a Guitar. | Feedback occurs when sound coming from the Cylindrical Radiator® is reintroduced into the System and amplified again. You typically hear either a high pitched squeal or a low pitched howl. The first usually comes from a vocal microphone and the second is more likely from an acoustic instrument like a Guitar. | ||
| Line 139: | Line 187: | ||
If you are a vocalist, one of the single most important things you can do is practice your microphone technique. You get the best [[Gain Before Feedback]] using close microphone technique. The presets for vocal mics are designed for that (close micing) technique. | If you are a vocalist, one of the single most important things you can do is practice your microphone technique. You get the best [[Gain Before Feedback]] using close microphone technique. The presets for vocal mics are designed for that (close micing) technique. | ||
== Troubleshooting == | |||
{{:Troubleshooting}} <!-- this is an inclusion of a separate article --> | |||
== Working with Others == | == Working with Others == | ||
[[Introducing Performers to the Bose System]] | [[Introducing Performers to the Bose System]] | ||
[[category:Feedback]] | [[category:Feedback]] | ||
[[category:Performance]] | [[category:Performance]] | ||
{{Snap}} | |||
Latest revision as of 06:57, 26 March 2017
The Unofficial Performers' Guide
for the Bose® Personalized Amplification System™ family of products.
If you will be using the Bose System for the first, second, or third time and are looking for quick-hit things you need to know you are in the right place. This is for you in the role of performer who may or may not actually own an L1® System.
If you just got your new System then you will want to check out the L1™ Unofficial Users' Guide which covers things that System owners like to know.
|
|
|


Setting Up
If you are stepping onto the stage and someone has made all the connections for you skip down to the section about Performing.
Physical Assembly
Basic Setup - Classic / Model I
Microphone Setup
Gain setup for a vocal microphone
Multiple Performers Sharing One L1® System
Electric guitarists used to play and sing through their amps, but this soon stopped when they started to concentrate on the tone of their guitars. Now, few musicians are willing to share their amps, based on the idea that any sound other than that of your instrument will somehow corrupt the tone. This is probably true for guitar amplifiers playing at heavy distortion levels (voice will be heavily modulated due to clipping). But it is not true of an L1® loudspeaker.
Sharing should be restricted to musicians located near each other on stage, for example, two background singers standing shoulder to shoulder, or a horn line.
Several instruments or instruments and voices can be amplified simultaneously with complete independence of tone and no corruption of any kind, other than having everything come from one source. Always try to take advantage of the ToneMatch® preset feature.
For instance, if you are doing a “single” and have a drum machine and/or sequencer driving a bunch of MIDI modules, use channels 1 and 2 for personal-preference preset settings, like your vocal microphone and, say, an acoustic guitar with a pickup. Then use an external mixer, which you probably have if this example describes your musical work, and put it into channel 3 or 4.
Connections General Examples

click the picture above for downloadable PDF version.
Interactive Tour of the Inputs and Outputs
Inputs and Outputs (interactive display) showing connections.
Connections for a Soloist

click the picture above for downloadable PDF version.
Soloist with Backing Tracks

Details about the Stereo to Mono Adapter
Connection: Stereo Mini (headphone or line-out source) to two Mono ¼ inch
Plug this into your MP3 Player/computer/minidisk/iPod (headphone or line out jack)
- (black end to MP3 Player) and
- coloured ends to
- PS1 Power Stand (Classic) / Model I Channels 1 and 2 OR Channels 3 and 4 OR
- T1 ToneMatch® Audio Engine Channel 4/5
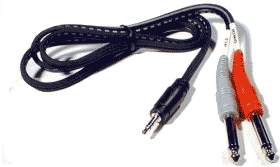
Source: Hosa CMP159
If you cannot locate a cable like the one above, you can accomplish the same thing with the combined cable and adaptors below.

and attach each coloured end to one of these,
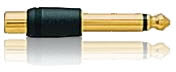
then connect to any of the ¼ inch inputs for L1 Model I or L1 Classic Channels 1/2/3/4. If you are using a T1 ToneMatch Audio Engine then you can use Channels 1,2,3 or 4/5.
If you are using the this kind of source as backing tracks, you will probably run these two connections to L1 Model I or L1 Classic Channels 3 and 4. In this case you will need to control volume and tone control from the sound source. You will not have much control through the L1 .
If you are using a T1 ToneMatch Audio Engine you will probably use Channel 4/5.
Connections for a Duo

click the picture above for downloadable PDF version.
Quick Hookup Guide
- Quick Hookup Guide - Print this and keep it handy (especially for people unfamiliar with the system). This is a 6 page pdf document, that you can print and leave at any venue that provides an L1™ Classic or Model I for performers to use. It includes most of the information above.
B1 Cables (blue)
- Make sure the Speakon cables (blue) are really connected. Insert and turn clockwise. There should be an audible click. You should have to slide the silver lock and twist counterclockwise to remove the cable. If you can remove it without a twist, it is not really connected.
ToneMatch® Presets
- Presets are used to get the best possible sound from your inputs. They are not meant to make something sound like something else (like Guitar processor or instrument patches). Note: The presets for vocal microphones are based on using close microphone techniques.
- Gain Staging
- Mixers Connection suggestions for specific mixers.
- Effects Connection notes for several different makes and models
If the stage is already set up, then it is time to talk about performing.
Performing
Hearing yourself
This is a different approach to amplifying your sound. The sound of your voice and/or instrument will come from an L1 Cylindrical Radiator® loudspeaker located 5-10 feet behind you. Unlike conventional approaches, you will not be behind the main speakers going to the room.
How does it sound? - It may seem unusual for a few minutes because you are hearing yourself in much the same way the audience is hearing you. This is a big difference because you will be hearing yourself in the context of the room instead of out of context in the monitor. ... full article
Mixing Yourself In Ensemble
Using a typical triple amplification system, a professional front-of-house mixer rides vocals, varies the level of horn sections and rides (and often misses) lead solos. They do this because they and not you can hear a mix over the mains “out front”. ... full article
Microphone Technique

"Sing as loud as you're going to sing with your lips touching the windscreen and adjust the trim so that the LED just flickers RED. (You can do this with the channel and master volumes on the remote turned all the way down. Remember that when you want to be your loudest vocally, you're lips should be touching the windscreen. You can always "work" the mic by backing away from it to lower volume but always remember that when you need to be loudest, you're kissing that windscreen. This technique is true for ANY live amplification system, not just ours. Please stay in touch with us here and let us know how you, er, well, make out." -- Ken-at-Bose
You will probably find that you hear yourself better with this system than in other live music situations. If you are new to the experience, you may want to back off from the microphone. Try this instead. Get up closer to the mic. Relax and get used to hearing yourself. You will find it is easier to sing when you can hear.
"Many owners, myself included, have found singing through L1 s to be reminiscent of singing in unamplified groups (big family, in my case), but different, sonically better. Unamplified, we control our timbre and dynamics with just our bodies - No mics to technique. With the L1 , staying on the mic (the simplest of techniques) allows us to sing that way, using our head to toes as our preamp and our lungs as our volume control. Here's where it gets better - With much more available volume, therefore much more dynamic range and coverage way out into the room, we can still bring it down to that unamplified-level whisper (and everyone, singers and audience, can hear every nuance - I love that!), then bring it back up to the brink of ouch! Very expressive. Very musical..." - - Chuck-at-Bose
Feedback
Feedback occurs when sound coming from the Cylindrical Radiator® is reintroduced into the System and amplified again. You typically hear either a high pitched squeal or a low pitched howl. The first usually comes from a vocal microphone and the second is more likely from an acoustic instrument like a Guitar.
Microphone Feedback (squeal)

- Point the mic above the Cylindrical Radiator® and slightly to the left or right of it
- Practice close mic technique "eat the mic"
- Avoid leaving the mic pointed in the general direction of the Cylindrical Radiator® with nothing in between.
- Check the gain staging. If you have the input sensitivity set too high, it can be difficult to avoid feedback.
- Use the remote to turn down the highs a little bit.
- Try presets #03 or #04 (High Gain Bright, High Gain Normal)
Instrument Feedback (howl)
The most likely source of a low end howl is an acoustic instrument like an Acoustic Guitar.
- Change the angle of the B1. Just change the direction at which it is pointed. Avoid having it pointed directly at the body of an acoustic Guitar.
- Use the Remote to turn down the lows a little bit. This will tend to clean up the mix overall even if you are not experiencing feedback.
- Try preset #44 or #85 (Sound Hole Notch)
Leaving the stage: Always turn down the R1 Remote Control Master Level.
The Remote

Why is the Volume Control in front of me?
Where is the sound-guy?
The R1 Remote gives you the final say about how you will sound in performance. The System once set properly is very stable and does not require a lot of real time tweaking. It is there for you to use if you want, but it does not have to distract you from doing the show.
What are all these knobs
and what will they do for me?
Find the Master Level (ringed in red - center bottom of the R1 Remote). This is your main control for all the sound coming out of the System. You will want to turn it down when you are not actively using the System. Use Channel 1 and 2 Level controls (just above the Master) to work out the balance between the two channels.
Use the Tone controls. Start with all these straight up at 12 o'clock and adjust to suit you.
Important: There is a tiny delay between making an adjustment and hearing the difference. Make small adjustments and then listen for difference. Otherwise you may tend add too much EQ. Make sure that the Remote is visible and easily accessible to you as you are playing. Use the velcro to make it stationary so you can adjust the controls with one hand.
Stage Volume
You and your audience are going to be hearing your performance in a new way. To be heard and understood you will probably run your stage at a lower volume than you have with other equipment.
Getting Ready
This section will suggest things that you can do to prepare to use the System for the first time. For example: Rehearsal
When you are rehearsing, stand or sit in the same positions as you will when performing. You want to hear yourself in the same way in rehearsal and performance so that making the transition from one to the other is relatively easy. One of the features of the System is localization: being able to hear everyone in their relative positions on stage. It is good to get a sense of that before you get to the stage.
Practice Your Microphone Technique
If you are a vocalist, one of the single most important things you can do is practice your microphone technique. You get the best Gain Before Feedback using close microphone technique. The presets for vocal mics are designed for that (close micing) technique.
Troubleshooting
There are several different forms of "trouble". At least initially, let's break them down into Acoustics, Gear, Venue, Power.
— Source: Troubleshooting - Wikipedia
|
Acoustics
Feedback
Feedback happens when the sound from the loudspeaker enters the microphone or instrument with pickup only to be re-amplified. With the L1 it is typically easier to manage unwanted feedback because you typically have fewer loudspeakers, and fewer microphones to manage per System. ... full article
Hearing Yourself
Hearing Yourself can be a challenge, especially if you are not the only performer playing through the L1 you are using. But even if you have you own L1 there can be challenges on stage. If this is your issue see: Hearing Yourself
Bass Regeneration
Bass Regeneration is a special class of feedback, or regeneration, that exists in all live amplification systems. It is a very insidious and hard-to-confront phenomenon, but it is responsible for a lot of bad sound. Resonances of all kind, including those of musical instruments and those of large “boomy” rooms will also contribute to bass regeneration. ... full article
Gear
No Sound
- Check the power (System on, power indicator green)
- Check your sound source
- Volume control on the sound source
- Batteries (e.g. Sound cuts out)
- Cables
- On/Off switch if there is one on the cable
- Signal Path
- Connect your sound source directly to the L1® system. That is: eliminate everything between your instrument or microphone and the L1® System.
- L1 Classic or L1 Model I try Power Stand Channels 1 or 2.
- L1 Classic or L1 Model I remove anything connected to the Channel 1 or Channel 2 insert points.
- L1 Model II and a T1 ToneMatch Audio Engine try Channels 1,2,3
- L1 Model II and no T1 ToneMatch Audio Engine try the Analog Input. Your signal source must NOT be stereo. See Model II - Stereo Source to Power Stand Analog Input?
- Connect your sound source directly to the L1® system. That is: eliminate everything between your instrument or microphone and the L1® System.
- Damaged B1 Bass Module Cables. See: B1 Cable Connections
Low Sound
You can hear the sound but it is not loud enough.
Bass sounds fuzzy
Warning - Use Blue B1 Cables NL4 cables with your L1 Classic / L1 Model I / L1 Model 1S L1 Model II
If you are using a B1 Bass Module with your Power Stand it is ESSENTIAL for proper operation that you use the BLUE cable supplied with the B1 Bass Module or B2 Bass Module. This is required so that the L1 Classic/L1 Model I/L1 Model 1S/L1 Model II Power Stand can correctly identify when there are bass modules connected to it and if so, how many.
Please click the picture above for ordering information.
- Note
- The B2 Bass Level Switch will not change the sound of the B2 Bass Module if you are not using the correct cable.
See: PS1 Power Stand / Bass Line Out for details about how the Power Stand adapts to the number of bass modules are connected to it.
You may also use high quality NL4 cables (four conductor cables).
Alternate and longer cables for B1s
Does not Respond to R1 Remote
- Check connections (See PS1 Powerstand Connections/Interactive for close up view of input panel).
- Power Stand
- Remote — try both top and bottom
- Make sure input sources are NOT plugged into Channel 1 or Channel 2 Insert points
Sound Drop Outs - Intermittent
Intermittent sound can result from:
- poor connection to the B1 Bass Module. Check the wires in the Speakon connectors. See: B1 Cable Connections
- poor connection to the R1 Remote. Reseat the connections at both ends.
- On the L1 Classic or L1 Model I check that the Presets buttons are completely on a Preset. If you have recently changed Presets, go up an then back down again to make sure you are completely dialed in. See: Preset 56.5 hint from DJ Argyx.
Sound Drop Outs - at High Volume
From Bill-at-Bose[1]
Hilmar[2] and I looked into sound dropouts further to find the root cause, and found the rather subtle issue that, depending on the wire gauges and how the wires were paired in the cable, loud bass signals (in the speaker pair of wires) in extra long cables could capacitively couple into the sensing pair of wires. When it happened, the L1 "thought" you were changing your B1 Bass Module configuration and would mute.
So we looked at capacitance per foot with different wire guages, and with twisted vs untwisted pairs in the same cable, and looked at our sensing algorithm, and did two things to solve the problem:
We had Mark at Audiopile.net send us some samples to our new spec, we checked them, and they worked well. This gave a method for our customers who needed a long B1 cable to get one that worked.
The second thing we did was redesign the L1 software so that it could "filter out" the effects of momentary crosstalk and not cause the problem. That way future L1's would not have the issue.
Intermittent Drop Outs Using the T1 ToneMatch Audio Engine and L1 Model II
The user manual states 5 amps or greater, so six amps is a good approximation. For that reason, we recommend only up to two L1 Model IIs on a single 15A circuit breaker in the US.
A quick review of four POSSIBLE causes of audio cutting out follows. That will help us determine what is going on.
Bass Module Cable
If there is a non-Bose B1/B2 cable, OR if the B1/B2 cable has a defective, loose connection, audio can intermittently mute. It may happen with loud music because the speaker will be vibrating and shake the loose connection. This will sound like a clean muting of all audio for a second or so. There will be no visual indication.
Fixable by tightening the screws in the connector.
For more details see: Sound Fading In and Out
Power Issues
Very low, out-of spec, AC power (less than ~105 VAC on a 120V system, or less than around ~215 V on a 230 V system. The manual states 110 and 220 for good measure) coupled with high signal level. This can be caused by a low power source, or one where the outlets are a very long distance from the electrical panel, extra equipment on the same electrical branch, power sags or dropouts, long or multiple extension cords, or small gauge extension cords.
In this case, loud music increases the current draw, and the voltage drop over the extension cord will lower the voltage enough to cause a reset of the ToneMatch Mixer[3], or the L1 Model II Power Stand.
If the ToneMatch Mixer[3] resets, the LEDs (input trim level, mute LEDs) will turn off. The LCD display will remain lit, but be blank until the unit restarts. The L1 Model II Power Stand can reset but it does not show on the indicators.
In either case, the answer is to ensure the power supply is solid and dedicated to the audio equipment, and to have as short cords as possible with large wires. Also be aware that separate wall outlets may still be on the same breaker.
If there are intermittent voltage sags or outages in your area (as there are in parts of Florida, for example), it is possible that some equipment that does not use a lot of power (like mixers) will continue to operate, and equipment requiring high power, like amplifiers, may not be able to produce audio.
Those outages can happen any time, but are less likely to repeat, or unlikely to happen only at loud parts of the music.
More: Power Considerations
Overheating
If the L1 Model II Power Stand overheats, it may shut down. This can happen under direct sunlight outdoors when the temperature exceeds the maximum operating temperature. Check the access to the fan is clear (opening at the front of the power stand) and that legs are on a flat sturdy surface. If the power stand is on a carpet, it may sink down and obscure the vents on the bottom.
Defective Unit
Defective units: If the items above are not the cause, then either the ToneMatch Mixer[3] or power stand may be defective, and you should contact customer service.
Volume Spikes
Sound Jumps - Spikes - and returns to normal volume.
R1 Remotes (Version 1)
2004-early 2005
Some users reported unexplained, momentary jumps in volume (spikes). This was tracked down the an issue with the R1 Remote.
Check the R1 Remote.
Look on the back. If there is not a designation "Model R1 '.ver 2'
you probably have an older remote.
Solution - call Support and get a new R1 Remote.
Call Support
Telephone the Bose Live Music Product & Technical Support Team (877) 335-2673 (U.S. and Canada only)* Hours of operation Monday-Friday: 9:00 AM - 9:00 PM ET
Workaround
Hilmar-at-Bose[4] ... a temporary workaround. Simply keep the channel volume and the master volume on the remote at or above the 12 o'clock setting. The easiest way to get there is to set the volumes to about 2 o'clock and dial in the trims on the powerstand so that the playing volume is about right. That gives you some space on the remote to back it up some and also plenty of head-room when things get a little "hot" during the night. That should eliminate all problems with the spike. That also means that you can use the remote and you do not need to peg the settings at 12 o'clock. I know that this is an inconvenience and we are working full throttle to get the issue finally resolved for all affected users.
Hiss
If you have all settings on the PS1 Power Stand (Classic) / Model I set straight-up (including the R1 Remote), with nothing connected, you may hear an audible hiss within 4-8 feet.
The reason: At these settings the System is running wide-open at full power with no input signal. If you use a microphone or a recorded source playing with these settings - the System would be extremely loud. When you provide an input signal source with appropriate trim settings the hiss should be inaudible.
Solution: Use the R1 Remote to lower the Master Level when you have no input signal source.
Note: It is recommended that you use the R1 Remote.
Related Discussions
- hiss with no inputs
- white noise issues
- white noise issues Bill-at-Bose
Popping Sounds on Shutdown
There are a couple of things you can do.
- Remove the Cylindrical Radiator® and B1 Bass Modules before turning off the Power Stand. You will not harm the Power Stand, and it will be easier to access the cables.
- If you are using a L1 Model I or L1 Classic, on the R1 Remote, turn down the Master Level.
Hum
You want to isolate the source of the hum, but this can be tricky because hum is usually the result of two or more devices interacting.
Start with the L1 fully assembled, no inputs, all settings on the R1 Remote straight up. If there is no hum then turn down the Master Level.
- Connect a sound source (simplest possible signal chain - for example microphone only).
- Turn up the Master Level
Keep adding items to the signal chain until you hear the hum. When you get the hum, remove the source and make sure that the hum goes away. When you are sure you know what is causing the hum, check that the source of the hum is connected to the same power source as the PS1 Power Stand (Classic) / Model I
- Try a DI with a ground lift between the device that causes the hum and the PS1 Power Stand (Classic) / Model I
Cell Phone
Do not leave your cell phone on or near the PS1 Power Stand (Classic) / Model I. If there is an incoming call, the ring may be amplified through the loudspeaker.
Computer
See: Computer/Sounds if you have a computer in your signal chain.
Venue
Small Stage
When offered a chance to play, one of my first questions is about the size and position of the stage. If you find that your show is going to be compromised by a small or awkwardly positioned stage, just ask:
- For more space
- If you may set-up in a better position in the room
- For permission to remove false walls, decorative railings, hanging obstructions, and anything that can be handled with a screwdriver, or is otherwise easily restored.
In an ideal situation you will have
- A minimum of eight feet of stage depth (more if you have a large room) and
- A minimum of four-six feet of stage width for each player
- If you have four (or more) performers then you might want width as above and stage depth at least 50%-75% of the width. The farther apart the players are, the more you will want some depth behind you everyone can hear one another.
Examples (minimums - width x length):
- Two performers: 8' x 8'
- Four performers: 16' x 8'
- Minimum: Width: 4 x 4' = 16' Depth 50% of Width = 8'
- Better: Width: 4 x 6' = 24' Depth 50% of Width = 12'
- Six performers: 24' x 12'
- Minimum: Width: 6 x 4' = 24' Depth 50% of Width = 12'
This makes for a tolerable stage, you will probably want a little more room, but you should be able to make this work.
Notes from Page 9 of the Bose® Personalized Amplification System™ family of products Owner's Guide
This is the owners guide for the L1 Classic copyright © 2005

Odd Stage Position
If placed in a corner, ask if you can be placed in the center of a wall. If the "short" wall in a rectangular room is wide enough, then that is probably your best choice for the wall behind you (if the long wall is not greater than 100 feet).
Power Considerations
Introduction
This information pertains to AC power sources for your L1 Model II, L1 Model 1S, L1 Compact, F1 Model 812 Flexible Array Loudspeaker, L1 Classic, L1 Model I
Reviewed and updated May 27, 2019.
Electrical Power
As a general note, we want to remind you that all electrical equipment must deal with poor power conditions and power outages. Hardware and software designs can be sophisticated in this regard and we put enormous effort in this area.
At a certain point, if the voltage drops too low from the wall circuit, or there is a power outage, contemporary digital electronics including ours will start a reset sequence. Assuming the AC power recovers, the reset sequence with digital electronics usually takes a few seconds. If that few seconds is longer than the power outage, it can be a frustrating wait.
There are practical things that musicians can do that will minimize the chance of an interruption in their performances – practices that are valuable to know and use in general for all stage equipment.
- Use AC extension cords that are as short as possible. Do not use a 100’ cord when a 25’ cord will do.
- Do not use thin-gauge or flimsy extension cords. Good cords are worth the extra expense.
- Avoid the practice of stringing AC extension cords together: if you have 20’ to the wall socket, use one 25’ cord rather than 3 x 8’ cords. The reason is that the electrical connectors at the junction between cords can introduce extra resistance, especially if they are bent or corroded.
- Split power-hungry equipment (amplifiers and lights) over as many different power circuits as you can. Lots of power-hungry equipment loaded onto one circuit will lower the voltage and can cause equipment resets and failures, especially in very loud musical performances.
- Check for non-performance-related equipment on stage circuits that may contain compressors or large motors: refrigerators, air conditioners, snow cone machines, etc. can cause a large drop in the voltage. If possible, move these appliances to other circuits or have them turned off during the performance.
Source: Bill-at-Bose
Surge Protectors
From Hilmar-at-Bose
Surge protectors are not a bad thing, although the Power Stands for the L1 Classic, Model I, Model 1S, Model II and Compact have built-in surge protection.
"Surge" means a lot of voltage coming through the power over a short period of time. That's pretty rare and the main cause is lightning, some accidents involving power lines (mostly on poles) being cut and touching something they shouldn't (e.g. the wrong side of a power transformer) and some really big compressors (e.g. industrial-sides freezers or fridges) turning on or off.
With the exception of lightning and some very bad power accidents, the Power Stand can handle that all fine by itself. With lightning, anything is possible. No piece of equipment that I know will survive a direct hit into a directly connected power line. But then again lightning might strike a few blocks (and transformers) away in which case a surge protector might be able to take the first hit and die quickly enough to protect the attached equipment.
In this regard, even cheap surge protectors will work fairly well and there is only a really small number of cases where a cheap and very expensive surge protector might make a difference.
On a side note, its a good idea to have all equipment that connects to the Power Stand on the same power strip. That helps with ground loops. On the other hand it's not a good idea to turn things on and off with the switch on the power strip. That may cause your fuse to blow (due to the so-called "in-rush current") and might result in pops and clicks.
The proper way to turn things on is to follow the signal, i.e.
- Instruments
- Outboard effects processors
- Power Stand
- External power amps (e.g. third-party power amps)
Turn off in the reverse order.
Source: Hilmar-at-Bose
Power Strips
There is no technical reason why a power strip, a power cord or any sort of power conditioner should make a difference [to the sound or your system]. Our system (and many others too) are designed to deal with all sorts of AC power fluctuation and have high-quality internal regulators. These regulate with much higher precision than any external device could do anyway, so "conditioning" or "cleaning" up the AC power doesn't make any audible difference whatsoever.
Source: Hilmar-at-Bose
Power Conditioning
We do not recommend external voltage regulators[5] because we found that in many cases they cause more harm than help. The amps and power supplies in the L1 use highly efficient switching technology, Many voltage regulators are not a good fit for this technology since they are simply not fast enough.
Source: Hilmar-at-Bose
We Bose designers do not believe that a power conditioner provides more headroom, dynamics, better sound, or more fidelity for our equipment.
There are a number of technical reasons for this that I won't go into online, but a good way to think of it is that we have already put in all the power conditioning required to make the products sound as good as possible.
Source: Bill-at-Bose ST 09:09, 12 August 2008 (EDT)
Reviewed with L1® Support June 16, 2014 ST 11:27, 16 June 2014 (EDT)
Background Information
The following is from a discussion with MikeZ-at-Bose
The power regulator/supply in the L1 takes in the AC wall voltage, whatever it is, and converts it down to much lower DC voltages to run the preamps, DSP's etc. As long as wall voltage is within the range I quoted earlier (90V-135V), the DC voltages that the preamps and DSP's see do not change. As part of the process of converting from AC to DC the power is also filtered. No matter what happens at the wall, the audio portions just see clean DC power. When the voltage goes outside the bounds, the unit just shuts down gracefully.
That's o.k. I like the engineering talk and thanks for your time. : )
I would love to know more about how it works if you have the time, cuz it sounds like you're telling me that in addition to a mixer section and power amps, the L1 base also houses a full voltage regulator and conditioner?
How does it work? Are you using a step-up transformer to regulate voltage? The reason I ask is because the process of simply converting AC to DC is a pretty common practice. : ) There are also many computer power supplies that use the conversion as a cleaning process, but that doesn't mean that the computer doesn't perform better from clean, consistent power.
My toaster is designed to work within a voltage range, since 110v is never guaranteed from your wall. So, I'm curious because I must just not understand. I wish I knew more about the engineering aspect of it. I can only report the facts of what I (and others) hear. Anyway, If you have the time, or the notion....I would be interested in a more in depth description. : ) Thanks
So first, why do we need power regulation or conditioning anyway?...
I just re-read your post and Im glad you mentioned the toaster! The toaster is like most electrical appliances in the world - it isn't very picky about it's power - and we would never notice the difference in performance. All the toaster does is take wall voltage and feed it to the heating element (the portion that glows red). If the wall voltage dips to 100, the power to the element drops proportionally. The toast will toast maybe ~18% slower in this extreme case. Noise on the AC line would have little effect on the element- the element takes a long time to heat up and cool down compared to the speed of the power changes, so it won't care about momentary dips. For example, if a refrigerator kicked in in a poorly wired house, the power may go down to 80V for a tenth of a second. The temperature of the element probably would not change measurably, and the end product (toast) would definitely not suffer.
With audio equipment, we are using our ears to judge the results. We're going to hear and care about sudden dips and changes in wall voltage, unless we regulate the power.
Digital equipment, like a computer, relies on constant voltage levels inside it's microchips to operate. These voltage levels (usually around 3.3 volts DC, or less) dictate the 'ons' and 'offs' at the heart of these devices. If the voltage goes outside a very narrow range, the digital does *not* degrade it's performance - it just ceases to operate.
The L1 has both analog audio portions (preamps, power amps), and digital portions (ToneMatch EQ's, effects in the T1, etc). Both of these portions rely on regulated, constant power to operate well. In the case of the digital portions, it relies on this constant supply of power to operate at all.
The power needed inside the L1 is DC. The amplifiers need around +/- 30V DC, the preamps need around +/- 18V DC, and the DSP's less than 5V.
How's it work?
The L1 uses a low noise switched-mode power supply. These are very light and efficient. Here's an article on how they work: http://en.wikipedia.org/wiki/Switched-mode_power_supply . In a switched mode supply (or switcher), the DC voltage is created from AC by rapidly switching a transistor on and off. The average of these on and off times, after a lot of filtering, becomes the DC voltage (pictures are in the wikipedia article). Regulation is done by varying the amount of the time the transistor is on and off. The switching occurs very fast, always more than 30,000 times per second. Sometimes much more. Switchers are an abstract concept and there isn't really a good analogy that I can think of for how they work.
For our supplies, there is a lot of extra filtering and tighter than usual regulation to make sure none of the artifacts from the wall power are audible. This is a major part of the product's design, and the focus of a lot of testing.
For some more reading on power supplies in general: http://en.wikipedia.org/wiki/Power_supply
Hope this is helpful and answers your questions
MikeZ-at-Bose
Source: MikeZ-at-Bose
Working with Others
Introducing Performers to the Bose System